HP Chromebook 11-2100 Maintenance and Service Guide - Page 32
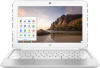
-For use only on HP Chromebook 11 G3 computer models, Remove the eleven Phillips PM1.9×6.7 screws
 |
View all HP Chromebook 11-2100 manuals
Add to My Manuals
Save this manual to your list of manuals |
Page 32 highlights
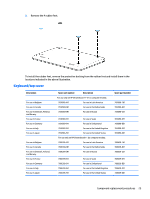
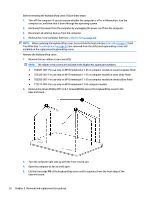
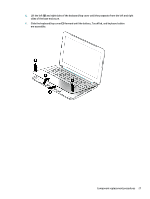
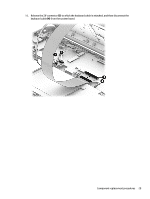
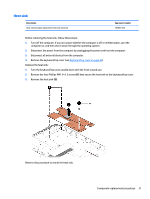
Before removing the keyboard/top cover, follow these steps: 1. Turn off the computer. If you are unsure whether the computer is off or in Hibernation, turn the computer on, and then shut it down through the operating system. 2. Disconnect the power from the computer by unplugging the power cord from the computer. 3. Disconnect all external devices from the computer. 4. Remove the 2 rear computer feet (see Computer feet on page 24). NOTE: When replacing the keyboard/top cover, be sure that the heat sink (see Heat sink on page 31) and TouchPad (see TouchPad board on page 32) are removed from the defective keyboard/top cover and installed on the replacement keyboard/top cover. Remove the keyboard/top cover: 1. Remove the two rubber screw covers (1). NOTE: The rubber screw covers are included in the Rubber Kit, spare part numbers: ● 762581-001-For use only on HP Chromebook 11-21xx computer models in ocean turquoise finish ● 762583-001-For use only on HP Chromebook 11-21xx computer models in snow white finish ● 762582-001-For use only on HP Chromebook 11-21xx computer models in sweet yellow finish ● 773211-001-For use only on HP Chromebook 11 G3 computer models 2. Remove the eleven Phillips PM1.9×6.7 screws (2) that secure the keyboard/top cover to the base enclosure. 3. Turn the computer right side up with the front toward you. 4. Open the computer as far as it will open. 5. Lift the front edge (1) of the keyboard/top cover until it separates from the front edge of the base enclosure. 26 Chapter 5 Removal and replacement procedures
-
 1
1 -
2
-
3
-
4
-
5
-
6
-
7
-
8
-
9
-
10
-
11
-
12
-
13
-
14
-
15
-
16
-
17
-
18
-
19
-
20
-
21
-
22
-
23
-
24
-
25
-
26
-
 27
27 -
 28
28 -
 29
29 -
 30
30 -
 31
31 -
 32
32 -
 33
33 -
 34
34 -
 35
35 -
 36
36 -
 37
37 -
38
-
39
-
40
-
41
-
42
-
43
-
44
-
45
-
46
-
47
-
48
-
49
-
50
-
51
-
52
-
53
-
54
-
55
-
56
-
57
-
58
-
59
-
60
-
61
-
62
-
63
-
64
-
65
-
66
-
67
-
68
-
69
-
70
 |
 |