HP Chromebook 11-2100 Maintenance and Service Guide - Page 61
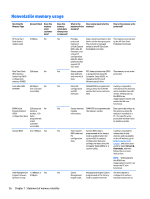
Security, Hard Drive Tools, Utilities, Secure Erase, Disk Sanitizer
 |
View all HP Chromebook 11-2100 manuals
Add to My Manuals
Save this manual to your list of manuals |
Page 61 highlights
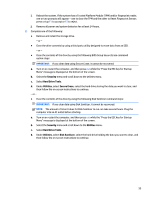
i. Reboot the system. If the system has a Trusted Platform Module (TPM) and/or fingerprint reader, one or two prompts will appear-one to clear the TPM and the other to Reset Fingerprint Sensor; press or tap F1 to accept or F2 to reject. j. Remove all power and system batteries for at least 24 hours. 2. Complete one of the following: ● Remove and retain the storage drive. - or - ● Clear the drive contents by using a third party utility designed to erase data from an SSD. - or - ● Clear the contents of the drive by using the following BIOS Setup Secure Erase command option steps: IMPORTANT: If you clear data using Secure Erase, it cannot be recovered. a. Turn on or restart the computer, and then press esc while the "Press the ESC key for Startup Menu" message is displayed at the bottom of the screen. b. Select the Security menu and scroll down to the Utilities menu. c. Select Hard Drive Tools. d. Under Utilities, select Secure Erase, select the hard drive storing the data you want to clear, and then follow the on-screen instructions to continue. - or - ● Clear the contents of the drive by using the following Disk Sanitizer command steps: IMPORTANT: If you clear data using Disk Sanitizer, it cannot be recovered. NOTE: The amount of time it takes for Disk Sanitizer to run can take several hours. Plug the computer into an AC outlet before starting. a. Turn on or restart the computer, and then press esc while the "Press the ESC key for Startup Menu" message is displayed at the bottom of the screen. b. Select the Security menu and scroll down to the Utilities menu. c. Select Hard Drive Tools. d. Under Utilities, select Disk Sanitizer, select the hard drive holding the data you want to clear, and then follow the on-screen instructions to continue. 55
-
 1
1 -
2
-
3
-
4
-
5
-
6
-
7
-
8
-
9
-
10
-
11
-
12
-
13
-
14
-
15
-
16
-
17
-
18
-
19
-
20
-
21
-
22
-
23
-
24
-
25
-
26
-
27
-
28
-
29
-
30
-
31
-
32
-
33
-
34
-
35
-
36
-
37
-
38
-
39
-
40
-
41
-
42
-
43
-
44
-
45
-
46
-
47
-
48
-
49
-
50
-
51
-
52
-
53
-
54
-
55
-
 56
56 -
 57
57 -
 58
58 -
 59
59 -
 60
60 -
 61
61 -
 62
62 -
 63
63 -
 64
64 -
 65
65 -
 66
66 -
67
-
68
-
69
-
70
 |
 |
