HP Cluster Platform Hardware Kits v2010 ProCurve 1U Rack Mount Bracket Install - Page 6
Installation Preparations
 |
View all HP Cluster Platform Hardware Kits v2010 manuals
Add to My Manuals
Save this manual to your list of manuals |
Page 6 highlights
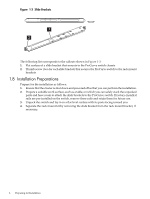
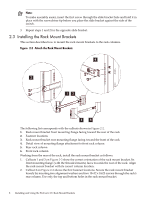
Figure 1-3 Slide Brackets 1 2 The following list corresponds to the callouts shown in Figure 1-3: 1. Flat surface of a slide bracket that mounts to the ProCurve switch chassis 2. Thumb screw (two for each slide bracket) that secures the ProCurve switch to the rack mount brackets 1.8 Installation Preparations Prepare for the installation as follows: 1. Ensure that the cluster is shut down and powered off so that you can perform the installation. 2. Prepare a suitable work surface, such as a table, on which you can safely stack the unpacked parts and have room to attach the slide brackets to the ProCurve switch. If factory-installed rails are pre-installed on the switch, remove these rails and retain them for future use. 3. Unpack the switch and lay it on a flat level surface with its ports facing toward you. 4. Separate the rack mount kit by removing the slide bracket from the rack mount bracket, if necessary. 6 Preparing for Installation
-
 1
1 -
 2
2 -
 3
3 -
 4
4 -
 5
5 -
 6
6 -
 7
7 -
 8
8 -
 9
9 -
 10
10 -
 11
11 -
 12
12 -
13
-
14
 |
 |
