HP Cluster Platform Hardware Kits v2010 ProCurve 1U Rack Mount Bracket Install - Page 8
Installing the Rack Mount Brackets
 |
View all HP Cluster Platform Hardware Kits v2010 manuals
Add to My Manuals
Save this manual to your list of manuals |
Page 8 highlights
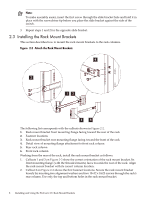
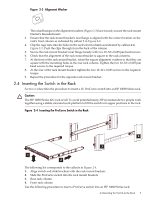
Note: To make assembly easier, insert the first screw through the slide bracket hole and hold it in place with the screwdriver tip before you place the slide bracket against the side of the switch. 3. Repeat steps 1 and 2 for the opposite slide bracket. 2.3 Installing the Rack Mount Brackets This section describes how to mount the rack mount brackets to the rack columns. Figure 2-2 Attach the Rack Mount Brackets 4 2 13 56 The following list corresponds with the callouts shown in Figure 2-2. 1. Rack mount bracket front mounting flange facing toward the rear of the rack 2. Fastener locations 3. Rack mount bracket rear mounting flange facing toward the front of the rack 4. Detail view of mounting flange attachment to front rack column 5. Rear rack column 6. Front rack column Working from the rear of the rack, install the rack mount bracket as follows: 1. Callouts 1 and 3 on Figure 2-2 show the correct orientation of the rack mount bracket. Its front mounting flange (with the threaded inserts) faces towards the rear of the rack. Align the rack mount bracket with its correct column location. 2. Callout 2 on Figure 2-2 shows the first fastener locations. Secure the rack mount bracket loosely by inserting two alignment washers and two 10-32 x 0.625 screws through the rack's rear column. Use only the top and bottom holes in the rack mount bracket. 8 Installing and Using the ProCurve 1U Rack Mount Brackets
-
 1
1 -
2
-
 3
3 -
 4
4 -
 5
5 -
 6
6 -
 7
7 -
 8
8 -
 9
9 -
 10
10 -
 11
11 -
 12
12 -
 13
13 -
14
 |
 |
