HP Color LaserJet CM1015/CM1017 HP Color LaserJet CM1015/CM1017 MFP Series - S - Page 154
Setting up the client computers
 |
View all HP Color LaserJet CM1015/CM1017 manuals
Add to My Manuals
Save this manual to your list of manuals |
Page 154 highlights
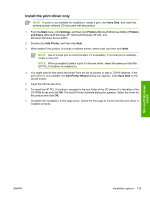
Microsoft Windows install 4. Click the Ports tab. Click to clear the Enable bidirectional support check box, and then click OK. Setting up the client computers After setting up the host computer to share the HP Color LaserJet CM1015 MFP/CM1017 MFP, the next step is to configure the client computers. Perform the following steps at all the other network computers that will use the HP Color LaserJet CM1015 MFP/CM1017 MFP. Setting up client computers running Microsoft Windows 2000 1. Click Start, click Settings, and then click Printers. 2. Double-click the Add Printer icon to open the Add Printer wizard. 3. Click Next to start the wizard. 4. Click the Network Printer option button, and then click Next. 5. Type in the path and share name of the HP Color LaserJet CM1015 MFP/CM1017 MFP. NOTE Or click Browse and navigate to find the HP Color LaserJet CM1015 MFP/CM1017 MFP. 6. Click Next. 7. Click Yes or No when prompted to use this MFP as the default printer for Microsoft Windows-based programs, and then click Next. 8. Click Finish to complete the installation and close the Add Printer wizard. NOTE You might need the product software CD to complete the print-driver installations. Setting up client computers running Microsoft Windows XP or Microsoft Windows Server 2003 1. Click Start, and then click Printers and Faxes. 2. In the column to the left, under Printer Tasks, click Add a printer to open the Add Printer wizard. 3. Click Next to start the wizard. 4. Click the A network printer or a printer attached to another computer option button, and then click Next. 5. Type the path and share name of the HP Color LaserJet CM1015 MFP/CM1017 MFP - OR Click Browse and navigate to find the HP Color LaserJet CM1015 MFP/CM1017 MFP. Click Next. 6. Click Yes or No when prompted to use this MFP as the default printer for Microsoft Windows-based programs, and then click Next. 7. Click Finish to complete the installation and close the Add Printer wizard. 132 Chapter 3 Install Microsoft Windows printing-system components ENWW
-
 1
1 -
2
-
3
-
4
-
5
-
6
-
7
-
8
-
9
-
10
-
11
-
12
-
13
-
14
-
15
-
16
-
17
-
18
-
19
-
20
-
21
-
22
-
23
-
24
-
25
-
26
-
27
-
28
-
29
-
30
-
31
-
32
-
33
-
34
-
35
-
36
-
37
-
38
-
39
-
40
-
41
-
42
-
43
-
44
-
45
-
46
-
47
-
48
-
49
-
50
-
51
-
52
-
53
-
54
-
55
-
56
-
57
-
58
-
59
-
60
-
61
-
62
-
63
-
64
-
65
-
66
-
67
-
68
-
69
-
70
-
71
-
72
-
73
-
74
-
75
-
76
-
77
-
78
-
79
-
80
-
81
-
82
-
83
-
84
-
85
-
86
-
87
-
88
-
89
-
90
-
91
-
92
-
93
-
94
-
95
-
96
-
97
-
98
-
99
-
100
-
101
-
102
-
103
-
104
-
105
-
106
-
107
-
108
-
109
-
110
-
111
-
112
-
113
-
114
-
115
-
116
-
117
-
118
-
119
-
120
-
121
-
122
-
123
-
124
-
125
-
126
-
127
-
128
-
129
-
130
-
131
-
132
-
133
-
134
-
135
-
136
-
137
-
138
-
139
-
140
-
141
-
142
-
143
-
144
-
145
-
146
-
147
-
148
-
 149
149 -
 150
150 -
 151
151 -
 152
152 -
 153
153 -
 154
154 -
 155
155 -
 156
156 -
 157
157 -
 158
158 -
 159
159 -
160
-
161
-
162
-
163
-
164
-
165
-
166
-
167
-
168
-
169
-
170
-
171
-
172
-
173
-
174
-
175
-
176
-
177
-
178
-
179
-
180
-
181
-
182
-
183
-
184
-
185
-
186
-
187
-
188
-
189
-
190
-
191
-
192
-
193
-
194
-
195
-
196
-
197
-
198
-
199
-
200
-
201
-
202
-
203
-
204
-
205
-
206
-
207
-
208
-
209
-
210
-
211
-
212
-
213
-
214
-
215
-
216
-
217
-
218
-
219
-
220
-
221
-
222
-
223
-
224
-
225
-
226
-
227
-
228
-
229
-
230
-
231
-
232
-
233
-
234
-
235
-
236
-
237
-
238
-
239
-
240
-
241
-
242
-
243
-
244
-
245
-
246
-
247
-
248
-
249
-
250
-
251
-
252
-
253
-
254
-
255
-
256
-
257
-
258
-
259
-
260
-
261
-
262
-
263
-
264
-
265
-
266
-
267
-
268
-
269
-
270
-
271
-
272
-
273
-
274
-
275
-
276
-
277
-
278
-
279
-
280
-
281
-
282
-
283
-
284
-
285
-
286
-
287
-
288
-
289
-
290
-
291
-
292
-
293
-
294
-
295
-
296
-
297
-
298
-
299
-
300
-
301
-
302
-
303
-
304
-
305
-
306
-
307
-
308
-
309
-
310
-
311
-
312
-
313
-
314
-
315
-
316
-
317
-
318
-
319
-
320
-
321
-
322
-
323
-
324
-
325
-
326
-
327
-
328
-
329
-
330
-
331
-
332
-
333
-
334
-
335
-
336
-
337
-
338
 |
 |
