HP Color LaserJet Professional CP5220 HP Color LaserJet CP5220 Series - Softwa - Page 212
Print on Both Sides check box, Print on both sides automatically, Print Borders, Order
 |
View all HP Color LaserJet Professional CP5220 manuals
Add to My Manuals
Save this manual to your list of manuals |
Page 212 highlights
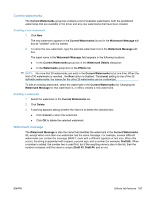
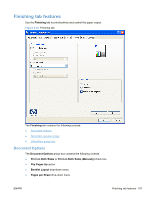
● Print Page Borders check box ● Page Order drop-down menu Figure 4-21 Finishing tab - Document Options group box Print on Both Sides check box NOTE: This feature is called Print on Both Sides (manually) for the base models because these models do not include an automatic duplex unit. For all other product models, this feature is called Print on Both Sides. The Print on Both Sides option controls the manual duplexing function of the HP Color LaserJet CP5220 Series printer. Print on both sides automatically The duplexing unit in the HP Color LaserJet CP5220 Series product prints on two sides of a sheet of paper when the Print on Both Sides option is specified in the print job. Duplex product models support smart duplexing. The smart duplexing feature increases printing performance by preventing one-page print jobs or single-sided pages of a duplexed print job from going through the duplexing unit even when the duplexing feature has been selected in the driver. All paper types support the smart duplexing feature, except for paper types that cannot be printed on both sides (such as labels, transparencies, and envelopes) and the following paper types: ● Prepunched ● Preprinted ● Letterhead When the paper type is set to Unspecified, the smart duplexing feature is disabled. To achieve the best print quality when printing on the second side of the page, the product needs to make adjustments to its print modes. When you select a paper type, you are, in effect, instructing the product to use a group of settings (such as fuser temperature and print speed) to print the paper with the best possible quality. This group of settings is known as print mode. A different print mode is used with each paper type. Print-mode adjustments for the second side of a duplexed page are automatic. 192 Chapter 4 HP PCL 6 print driver and HP UPD PS for Windows ENWW
-
 1
1 -
2
-
3
-
4
-
5
-
6
-
7
-
8
-
9
-
10
-
11
-
12
-
13
-
14
-
15
-
16
-
17
-
18
-
19
-
20
-
21
-
22
-
23
-
24
-
25
-
26
-
27
-
28
-
29
-
30
-
31
-
32
-
33
-
34
-
35
-
36
-
37
-
38
-
39
-
40
-
41
-
42
-
43
-
44
-
45
-
46
-
47
-
48
-
49
-
50
-
51
-
52
-
53
-
54
-
55
-
56
-
57
-
58
-
59
-
60
-
61
-
62
-
63
-
64
-
65
-
66
-
67
-
68
-
69
-
70
-
71
-
72
-
73
-
74
-
75
-
76
-
77
-
78
-
79
-
80
-
81
-
82
-
83
-
84
-
85
-
86
-
87
-
88
-
89
-
90
-
91
-
92
-
93
-
94
-
95
-
96
-
97
-
98
-
99
-
100
-
101
-
102
-
103
-
104
-
105
-
106
-
107
-
108
-
109
-
110
-
111
-
112
-
113
-
114
-
115
-
116
-
117
-
118
-
119
-
120
-
121
-
122
-
123
-
124
-
125
-
126
-
127
-
128
-
129
-
130
-
131
-
132
-
133
-
134
-
135
-
136
-
137
-
138
-
139
-
140
-
141
-
142
-
143
-
144
-
145
-
146
-
147
-
148
-
149
-
150
-
151
-
152
-
153
-
154
-
155
-
156
-
157
-
158
-
159
-
160
-
161
-
162
-
163
-
164
-
165
-
166
-
167
-
168
-
169
-
170
-
171
-
172
-
173
-
174
-
175
-
176
-
177
-
178
-
179
-
180
-
181
-
182
-
183
-
184
-
185
-
186
-
187
-
188
-
189
-
190
-
191
-
192
-
193
-
194
-
195
-
196
-
197
-
198
-
199
-
200
-
201
-
202
-
203
-
204
-
205
-
206
-
 207
207 -
 208
208 -
 209
209 -
 210
210 -
 211
211 -
 212
212 -
 213
213 -
 214
214 -
 215
215 -
 216
216 -
 217
217 -
218
-
219
-
220
-
221
-
222
-
223
-
224
-
225
-
226
-
227
-
228
-
229
-
230
-
231
-
232
-
233
-
234
-
235
-
236
-
237
-
238
-
239
-
240
-
241
-
242
-
243
-
244
-
245
-
246
-
247
-
248
-
249
-
250
-
251
-
252
-
253
-
254
-
255
-
256
-
257
-
258
-
259
-
260
-
261
-
262
-
263
-
264
-
265
-
266
-
267
-
268
-
269
-
270
-
271
-
272
-
273
-
274
-
275
-
276
-
277
-
278
-
279
-
280
-
281
-
282
-
283
-
284
-
285
-
286
-
287
-
288
-
289
-
290
 |
 |
