HP DeskJet GT 5820 User Guide - Page 88
Power, Cancel, To clear a paper jam inside of the printer
 |
View all HP DeskJet GT 5820 manuals
Add to My Manuals
Save this manual to your list of manuals |
Page 88 highlights
f. Remove the jammed paper. g. Close the printhead access door, and then close the front door. h. Pull out the output tray and the tray extender. 3. Press the Power button ( ) to turn on the printer. To clear a paper jam inside of the printer 1. Press the Cancel button ( ) to try to clear the jam automatically. If this does not work, complete the following steps to clear the jam manually. 2. Press the Power button ( ) to turn off the printer. 3. Turn the ink valve to the locked position. 82 Chapter 8 Solve a problem ENWW
-
 1
1 -
2
-
3
-
4
-
5
-
6
-
7
-
8
-
9
-
10
-
11
-
12
-
13
-
14
-
15
-
16
-
17
-
18
-
19
-
20
-
21
-
22
-
23
-
24
-
25
-
26
-
27
-
28
-
29
-
30
-
31
-
32
-
33
-
34
-
35
-
36
-
37
-
38
-
39
-
40
-
41
-
42
-
43
-
44
-
45
-
46
-
47
-
48
-
49
-
50
-
51
-
52
-
53
-
54
-
55
-
56
-
57
-
58
-
59
-
60
-
61
-
62
-
63
-
64
-
65
-
66
-
67
-
68
-
69
-
70
-
71
-
72
-
73
-
74
-
75
-
76
-
77
-
78
-
79
-
80
-
81
-
82
-
 83
83 -
 84
84 -
 85
85 -
 86
86 -
 87
87 -
 88
88 -
 89
89 -
 90
90 -
 91
91 -
 92
92 -
 93
93 -
94
-
95
-
96
-
97
-
98
-
99
-
100
-
101
-
102
-
103
-
104
-
105
-
106
-
107
-
108
-
109
-
110
-
111
-
112
-
113
-
114
-
115
-
116
-
117
-
118
-
119
-
120
-
121
-
122
-
123
-
124
-
125
-
126
-
127
-
128
-
129
-
130
-
131
-
132
-
133
 |
 |

f.
Remove the jammed paper.
g.
Close the printhead access door, and then close the front door.
h.
Pull out the output tray and the tray extender.
3.
Press the
Power
button (
) to turn on the printer.
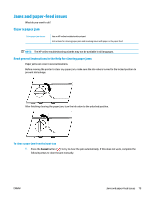
To clear a paper jam inside of the printer
1.
Press the
Cancel
button (
) to try to clear the jam automatically. If this does not work, complete the
following steps to clear the jam manually.
2.
Press the
Power
button (
) to turn
off
the printer.
3.
Turn the ink valve to the locked position.
82
Chapter 8
Solve a problem
ENWW