HP Deskjet 1200c HP Photo Scanner 1200 - (English) User Manual - Page 16
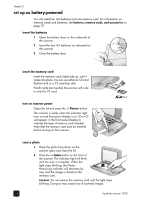
set up as battery-powered, insert the batteries, insert the memory card, turn on scanner power
 |
View all HP Deskjet 1200c manuals
Add to My Manuals
Save this manual to your list of manuals |
Page 16 highlights
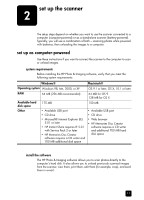
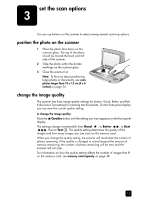
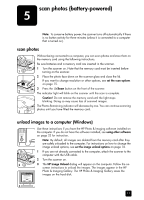
3 set the scan options You can use buttons on the scanner to select among several scanning options. position the photo on the scanner 1 Place the photo face down on the scanner glass. The top of the photo should be toward the back and left side of the scanner. 2 Slide the photo within the border markings on the scanner glass. 3 Close the scanner lid. Note: To find out about positioning large photos or documents, see scan photos larger than 10 x 15 cm (4 x 6 inches) on page 25. change the image quality The scanner has three image quality settings for photos: Good, Better, and Best. It also has a Text setting for scanning text documents. On the front panel display you can view the current quality setting. to change the image quality: Press the Quality button until the setting you want appears on the front panel display. The settings change incrementally from Good , to Better , to Best , then to Text . The quality setting determines the quality of the images and how many images you can store on the memory card. When you change the quality setting, the scanner will recalculate the number of photos remaining. If the quality is changed to a level beyond the amount of memory remaining, the number of photos remaining will be zero and the scanner will not scan. For information on how the quality setting affects the number of images that fit on the memory card, see memory card capacity on page 38. 15
-
 1
1 -
2
-
3
-
4
-
5
-
6
-
7
-
8
-
9
-
10
-
 11
11 -
 12
12 -
 13
13 -
 14
14 -
 15
15 -
 16
16 -
 17
17 -
 18
18 -
 19
19 -
 20
20 -
 21
21 -
22
-
23
-
24
-
25
-
26
-
27
-
28
-
29
-
30
-
31
-
32
-
33
-
34
-
35
-
36
-
37
-
38
-
39
-
40
-
41
-
42
-
43
-
44
-
45
-
46
-
47
-
48
 |
 |