HP Deskjet 1200c HP Photo Scanner 1200 - (English) User Manual - Page 17
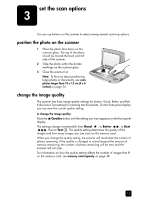
set the scan options, position the photo on the scanner, change the image quality, When you scan
 |
View all HP Deskjet 1200c manuals
Add to My Manuals
Save this manual to your list of manuals |
Page 17 highlights
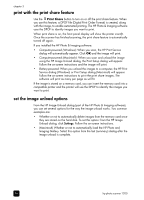
chapter 3 print with the print share feature Use the Print Share button to turn on or off the print share feature. When you use this feature, a DPOF file (Digital Print Order Format) is created, along with the image, to enable automated printing. The HP Photo & Imaging software uses the DPOF to identify images you want to print. When print share is on, the front panel display will show the printer icon . Once the scanner has finished scanning, the print share feature is automatically turned off again. If you installed the HP Photo & Imaging software: • Computer-powered (Windows): When you scan, the HP Print Service dialog will automatically appear. Click OK and the image will print. • Computer-powered (Macintosh): When you scan and unload the image using the HP Image Unload dialog, the Print Setup dialog will appear. Follow the on-screen instructions and the image will print. • Battery-powered: When you unload the images to a computer, the HP Print Service dialog (Windows) or Print Setup dialog (Macintosh) will appear. Follow the on-screen instructions to print the print share images. The software will print as many per page as will fit. If the image is stored on a memory card, you can insert the memory card into a compatible printer and the printer will use the DPOF to identify the images you want to print. set the image unload options From the HP Image Unload dialog (part of the HP Photo & Imaging software), you can set several options for the way the image unload works. Two common examples are: • Whether or not to automatically delete images from the memory card once they are stored on the hard disk. To set this option: from the HP Image Unload dialog, click Settings. Follow the on-screen instructions. • (Macintosh) Whether or not to automatically load the HP Photo and Imaging Gallery. Select this option from the last (summary) dialog after the image unload is complete. 16 hp photo scanner 1200
-
 1
1 -
2
-
3
-
4
-
5
-
6
-
7
-
8
-
9
-
10
-
11
-
 12
12 -
 13
13 -
 14
14 -
 15
15 -
 16
16 -
 17
17 -
 18
18 -
 19
19 -
 20
20 -
 21
21 -
 22
22 -
23
-
24
-
25
-
26
-
27
-
28
-
29
-
30
-
31
-
32
-
33
-
34
-
35
-
36
-
37
-
38
-
39
-
40
-
41
-
42
-
43
-
44
-
45
-
46
-
47
-
48
 |
 |