HP Deskjet 200cci HP DeskJet 420 Series Printer Users Guide - C2642-90066 - Page 5
STEP 4: Installing an Inkjet Print Cartridge - printer cartridge
 |
View all HP Deskjet 200cci manuals
Add to My Manuals
Save this manual to your list of manuals |
Page 5 highlights
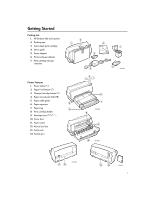
STEP 3: Loading Paper The HP DeskJet 420 series printer prints on plain paper and other paper types. Most plain paper used for photocopying yields good results. See page 17, "Recommended Printable Weight," for information on other paper types you can use. See also page 6 for information on loading other size paper, envelopes, labels, and thick paper. 1. Remove the packing tape to release the paper tray. 2. Open the paper tray. 3. Extend the paper tray to the appropriate mark (US Letter or A4) for the paper size you are using. 4. Switch the paper size selector to match the paper you are using (LTR or A4). STEP 4: Installing an Inkjet Print Cartridge Note: Use one of the following inkjet print cartridges. You can use only one of these at one time. Tri-Color HP51625A (supplied with printer) Large Black HP51626A (optional) Black HP51626G (optional) 1. Press the Power button ( ) to turn the printer on. 2. Open the printer door. 2642011 2642009 5. Insert a stack of paper squarely into the paper tray, print side down, until it can go no farther. Note: If you are loading letterheads or HP transparencies, insert them print side down, with the top of the page going into the printer first. 6. Move the paper width guide so that it presses lightly against the paper stack. Sharp edges 2642012 CAUTION: The star wheels on the printer door have sharp edges. Make sure your hand does not come in contact with the star wheels. 3. Remove the inkjet print cartridge from its box. 4. Gently remove the tape(s) covering the ink nozzles. Be careful not to touch the ink nozzles or the copper contacts. 2642013 2642010 3
-
 1
1 -
 2
2 -
 3
3 -
 4
4 -
 5
5 -
 6
6 -
 7
7 -
 8
8 -
 9
9 -
 10
10 -
 11
11 -
12
-
13
-
14
-
15
-
16
-
17
-
18
-
19
-
20
-
21
-
22
-
23
-
24
 |
 |
