HP Deskjet 630c (English) DJ 630C Printer - Reference Manual - Page 12
Parts of the document are missing, or are in the wrong place, Remove HP DeskJet 630C Series - series software
 |
View all HP Deskjet 630c manuals
Add to My Manuals
Save this manual to your list of manuals |
Page 12 highlights
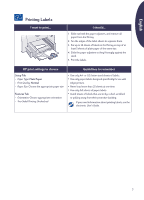
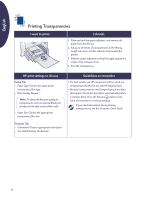
English Error writing to LPT1. You may not have plugged your USB cable in before installing the software. 1. Disconnect the USB cable from your printer. 2. Insert the printer software CD (or Disk 1 if you have diskettes) into your computer. 3. Click the Start button, then click Run. 4. Browse to the CD or diskette drive. Select Setup, and then click Open. 5. The setup.exe file will appear in the dialog box. Click OK. 6. Select the Remove HP DeskJet 630C Series software option to remove the software. 7. Connect the USB cable to your printer again. The USB installation screen should appear again. 8. Repeat the "Install USB and printer software" step. See your Quick Start Poster or your electronic User's Guide. Parts of the document are missing or are in the wrong place Paper orientation. If the printing is positioned incorrectly on the page, make sure you've selected the correct orientation (Portrait or Landscape) on the Features tab of the HP print settings box. Paper size. Make sure you have selected the correct paper size in the Setup tab of the HP print settings box. Alignment. If the color ink and black ink don't line up on the printed page and you are using two print cartridges, align the print cartridges. In the HP Toolbox, click the Printer Services tab, and then click Align the Print Cartridges. Paper loading. If the printing is slanted or skewed, try reloading the paper. Make sure the paper adjusters fit snugly against the media. Margin settings. If text is running off the edge of the page: • Make sure the margins are set correctly in your software program. • Make sure the elements in your document fit within the printable area of the page. • Make sure you've selected the right paper size on the Setup tab of the HP print settings box. Colors. If the colors are wrong or missing: • Clean your Tri-Color print cartridge. In the HP Toolbox, click the Printer Services tab, and then click Clean the Print Cartridges. • Replace the Tri-Color print cartridge. • Check Print in Grayscale to clear this option on the Advanced tab of the HP print settings box. • Consider installing an optional black print cartridge or HP photo cartridge in the right section of the print cartridge cradle. Communications. If meaningless characters are printing on your page, the computer might have lost communication with your printer. Try turning your computer and printer off and then turn them on again. If the problem persists, make sure all cables are securely attached. Print cartridge cradle contacts. The back plate between the right print cartridge and the print cartridge cradle may need cleaning. This problem might happen if you add an optional print cartridge after the printer has been used with only one print cartridge. To clean the back plate: 1. Turn on the printer and open the top cover. After the cradle finishes moving to an accessible position, unplug the power cord from the rear of the printer. WARNING: Do NOT touch the print cartridge ink nozzles or copper contacts. Touching these parts can result in clogs, ink failure, and bad electrical connections. 2. Grasp the top of the right print cartridge, pull it toward you until it pops loose, and lift it out of the cradle. CAUTION: Avoid touching the electrical contacts on the inside of the cradle. 12
-
 1
1 -
2
-
3
-
4
-
5
-
6
-
 7
7 -
 8
8 -
 9
9 -
 10
10 -
 11
11 -
 12
12 -
 13
13 -
 14
14 -
 15
15 -
 16
16 -
 17
17 -
18
-
19
-
20
-
21
-
22
-
23
-
24
 |
 |
