HP Deskjet 630c (English) DJ 630C Printer - Reference Manual - Page 2
How to Print, Basic Printing - printer
 |
View all HP Deskjet 630c manuals
Add to My Manuals
Save this manual to your list of manuals |
Page 2 highlights
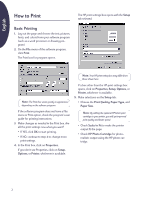
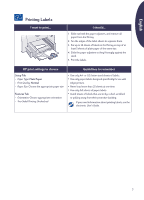
English How to Print Basic Printing 1. Lay out the page and choose the text, pictures, fonts, and colors from your software program (such as a word processor or drawing program). 2. On the File menu of the software program, click Print. The Print box for program opens. The HP print settings box opens with the Setup tab selected. Note: Your HP print setting box may differ from those shown here. Note: The Print box varies greatly in appearance depending on the software program. If the software program does not have a File menu or Print option, check the program's user guide for printing instructions. 3. Make changes as needed in the Print box. Are all the print settings now what you want? • If YES, click OK to start printing. • If NO, continue to step 4 to change more print settings. 4. In the Print box, click on Properties. If you don't see Properties, click on Setup, Options, or Printer, whichever is available. If a box other than the HP print settings box opens, click on Properties, Setup, Options, or Printer, whichever is available. 5. Make selections on the Setup tab: • Choose the Print Quality, Paper Type, and Paper Size. Note: By adding the optional HP black print cartridge to your printer, you will get improved print quality and faster speed. • Check Scale to Fit to make the printer output fit the page. • Check HP Photo Cartridge for photorealistic output using the HP photo cartridge. 2
-
 1
1 -
 2
2 -
 3
3 -
 4
4 -
 5
5 -
 6
6 -
 7
7 -
 8
8 -
9
-
10
-
11
-
12
-
13
-
14
-
15
-
16
-
17
-
18
-
19
-
20
-
21
-
22
-
23
-
24
 |
 |
