HP Deskjet 9600 HP Deskjet 9600 - User Guide - Page 51
Printing on envelopes, For Windows, Paper/Quality, Size is, For Macintosh, Setup, Print
 |
View all HP Deskjet 9600 manuals
Add to My Manuals
Save this manual to your list of manuals |
Page 51 highlights
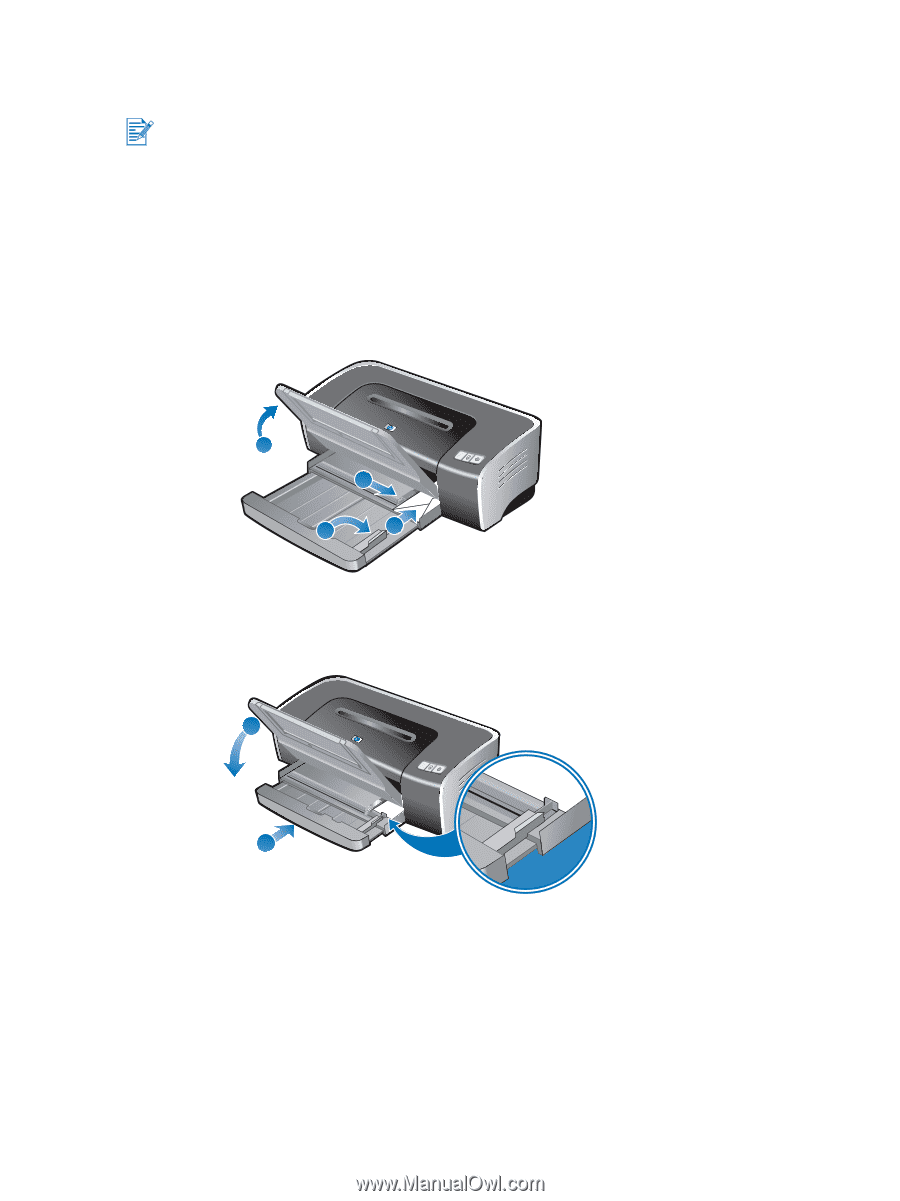
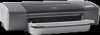
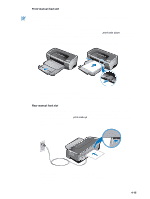
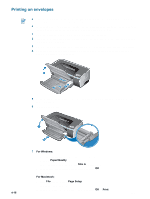
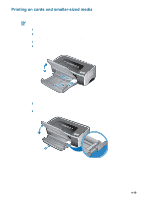
Printing on envelopes If you are printing one or just a few envelopes, you can use the front manual feed slot. See "Printing with the front or rear manual feed slot". Avoid using envelopes that have clasps or windows; have thick, irregular, or curled edges; are shiny or embossed; or are wrinkled, torn, or otherwise damaged. 1 Raise the output tray and remove any media from the input tray. 2 Insert up to 15 envelopes along the right side of the input tray, with the flaps facing up and to the right, until they stop. 3 Open the small media guide by moving it 90 degrees clockwise from start to end position. 4 Press the button on top of the paper width guide and slide the guide to the right until it stops at the edge of the envelopes. 1 4 3 2 5 Press the input tray lock and retract the tray until the small media guide stops at the edge of the envelopes. 6 Lower the output tray. 6 4-18 5 7 For Windows: i Open the printer driver (see "Printing a document"). ii Click the Paper/Quality tab. iii Select the envelope size from the Size is drop-down list. iv Change any other desired print settings and click OK. v Print your file. For Macintosh: i Click File, and then click Page Setup. ii Select the envelope size. iii Change any other desired print settings and click OK or Print. ENWW
-
 1
1 -
2
-
3
-
4
-
5
-
6
-
7
-
8
-
9
-
10
-
11
-
12
-
13
-
14
-
15
-
16
-
17
-
18
-
19
-
20
-
21
-
22
-
23
-
24
-
25
-
26
-
27
-
28
-
29
-
30
-
31
-
32
-
33
-
34
-
35
-
36
-
37
-
38
-
39
-
40
-
41
-
42
-
43
-
44
-
45
-
 46
46 -
 47
47 -
 48
48 -
 49
49 -
 50
50 -
 51
51 -
 52
52 -
 53
53 -
 54
54 -
 55
55 -
 56
56 -
57
-
58
-
59
-
60
-
61
-
62
-
63
-
64
-
65
-
66
-
67
-
68
-
69
-
70
-
71
-
72
-
73
-
74
-
75
-
76
-
77
-
78
-
79
-
80
-
81
-
82
-
83
-
84
-
85
-
86
-
87
-
88
-
89
-
90
-
91
-
92
-
93
-
94
-
95
-
96
-
97
-
98
-
99
-
100
-
101
-
102
-
103
-
104
-
105
-
106
-
107
-
108
-
109
-
110
-
111
-
112
-
113
-
114
-
115
-
116
-
117
-
118
-
119
-
120
-
121
-
122
-
123
 |
 |