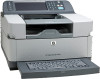
HP Digital Sender 9000 HP 9250C Digital Sender - User Guide - Page 24
Default Job Options menu, Default Options for Originals, Image Adjustment
 |
View all HP Digital Sender 9000 manuals
Add to My Manuals
Save this manual to your list of manuals |
Page 24 highlights
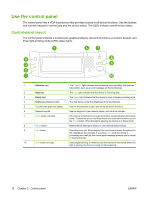
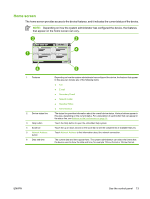
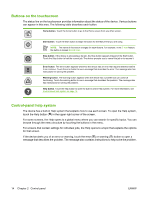
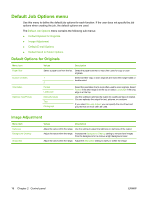
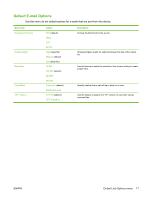
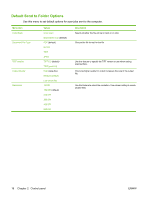
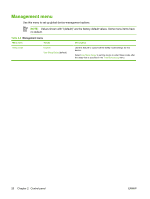
Default Job Options menu Use this menu to define the default job options for each function. If the user does not specify the job options when creating the job, the default options are used. The Default Job Options menu contains the following sub-menus: ● Default Options for Originals ● Image Adjustment ● Default E-mail Options ● Default Send to Folder Options Default Options for Originals Menu item Paper Size Number of Sides Orientation Optimize Text/Picture Values Description Select a paper size from the list. Select the paper size that is most often used for copy or scan originals. 1 Select whether copy or scan originals are most often single-sided or double-sided. 2 Portrait Landscape Select the orientation that is most often used to scan originals. Select Portrait if the short edge is at the top or select Landscape if the long edge is at the top. Manually Adjust Text Photograph Use this setting to optimize the output for a particular type of original. You can optimize the output for text, pictures, or a mixture. If you select Manually Adjust, you can specify the mix of text and pictures that will most often be used. Image Adjustment Menu item Darkness Background Cleanup Sharpness Values Description Adjust the value within the range. Use the setting to adjust the lightness or darkness of the output. Adjust the value within the range. Increase the Background Cleanup setting to remove faint images from the background or to remove a light background color. Adjust the value within the range. Adjust the Sharpness setting to clarify or soften the image. 16 Chapter 2 Control panel ENWW
-
 1
1 -
2
-
3
-
4
-
5
-
6
-
7
-
8
-
9
-
10
-
11
-
12
-
13
-
14
-
15
-
16
-
17
-
18
-
 19
19 -
 20
20 -
 21
21 -
 22
22 -
 23
23 -
 24
24 -
 25
25 -
 26
26 -
 27
27 -
 28
28 -
 29
29 -
30
-
31
-
32
-
33
-
34
-
35
-
36
-
37
-
38
-
39
-
40
-
41
-
42
-
43
-
44
-
45
-
46
-
47
-
48
-
49
-
50
-
51
-
52
-
53
-
54
-
55
-
56
-
57
-
58
-
59
-
60
-
61
-
62
-
63
-
64
-
65
-
66
-
67
-
68
-
69
-
70
-
71
-
72
-
73
-
74
-
75
-
76
-
77
-
78
-
79
-
80
-
81
-
82
-
83
-
84
-
85
-
86
-
87
-
88
-
89
-
90
-
91
-
92
-
93
-
94
-
95
-
96
-
97
-
98
-
99
-
100
-
101
-
102
-
103
-
104
-
105
-
106
-
107
-
108
 |
 |
