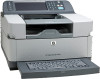
HP Digital Sender 9000 HP 9250C Digital Sender - User Guide - Page 53
Send an e-mail, Use the Send E-mail screen, Send a document
 |
View all HP Digital Sender 9000 manuals
Add to My Manuals
Save this manual to your list of manuals |
Page 53 highlights
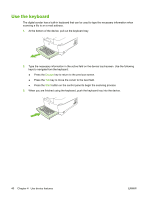
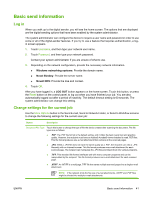
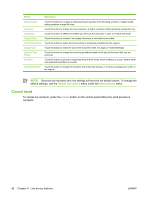
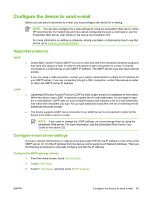
Send an e-mail The device scans both black-and-white and color originals. You can use default settings or change the scanning preferences and file formats. The following are the default settings: ● Color ● PDF (requires the recipient to have an Adobe Acrobat viewer to view the e-mail attachment) Use the Send E-mail screen Use the touchscreen to navigate through the options on the Send E-mail screen. 1 Send E-mail button Touching this button scans the document and sends an e-mail file to the provided e-mail addresses. 2 Home button Touching this button opens the Home screen. 3 From: field Touch this field to open the keyboard, and then type your e-mail address. If the system administrator has configured the device to do so, this field might automatically insert a default address. 4 To: field Touch this field to open the keyboard, and then type the e-mail addresses of those whom you want to receive the scanned document. 5 Subject: field Touch this field to open the keyboard, and then type a subject title. 6 More Options button Touch this button to change certain e-mail settings for the current scan job. 7 Scroll bar Use the scroll bar to view and set up the CC:, BCC:, Message, and File Name fields. Touch any of those fields to open the keyboard and add the necessary information. 8 Address book buttons Touch these buttons to use the address book to populate the To:, CC:, or BCC: fields. For more information, see Use the address book on page 46. 9 Help button Touch this button for control-panel help. For more information, see Use the control panel on page 12. 10 Error/warning button This button appears only when there is an error or warning in the status line area. Touch it to open a pop-up screen that will help you resolve the error or warning. Send a document 1. Place the document face-down on the scanner glass or face-up in the ADF. 2. From the Home screen, touch E-mail. ENWW Send an e-mail 45
-
 1
1 -
2
-
3
-
4
-
5
-
6
-
7
-
8
-
9
-
10
-
11
-
12
-
13
-
14
-
15
-
16
-
17
-
18
-
19
-
20
-
21
-
22
-
23
-
24
-
25
-
26
-
27
-
28
-
29
-
30
-
31
-
32
-
33
-
34
-
35
-
36
-
37
-
38
-
39
-
40
-
41
-
42
-
43
-
44
-
45
-
46
-
47
-
 48
48 -
 49
49 -
 50
50 -
 51
51 -
 52
52 -
 53
53 -
 54
54 -
 55
55 -
 56
56 -
 57
57 -
 58
58 -
59
-
60
-
61
-
62
-
63
-
64
-
65
-
66
-
67
-
68
-
69
-
70
-
71
-
72
-
73
-
74
-
75
-
76
-
77
-
78
-
79
-
80
-
81
-
82
-
83
-
84
-
85
-
86
-
87
-
88
-
89
-
90
-
91
-
92
-
93
-
94
-
95
-
96
-
97
-
98
-
99
-
100
-
101
-
102
-
103
-
104
-
105
-
106
-
107
-
108
 |
 |
