HP ENVY 13-y000 Maintenance and Service Guide - Page 42
Display assembly, Disconnect all external devices from the computer.
 |
View all HP ENVY 13-y000 manuals
Add to My Manuals
Save this manual to your list of manuals |
Page 42 highlights
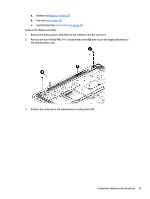
Reverse this procedure to install the heat sink. Display assembly Description Spare part number 13.3-in, UHD (3840×2160), WLED, BrightView, ultraslim-flat (2.00-mm), UWVA, (eDP 1.3+PSR), TouchScreen display assembly with flush glass design, 72% color gamut; typical brightness: 340 nits; 16:9 ultra wide aspect ratio; equipped with an FHD webcam/microphone module 906707-001 13.3-in, QHD+ (3200×1800), WLED, BrightView ultraslim-flat (2.60-mm), UWVA, (eDP 1.2), TouchScreen display assembly with flush glass design, 72% color gamut; typical brightness: 300 nits; 16:9 ultra wide aspect ratio; equipped with an FHD webcam/microphone module 906706-001 13.3-in, UHD (3840×2160), WLED, BrightView, ultraslim-flat (2.00-mm), UWVA, (eDP 1.3+PSR), TouchScreen display assembly with flush glass design, 72% color gamut; typical brightness: 340 nits; 16:9 ultra wide aspect ratio; equipped with an HD webcam/microphone module 914609-001 13.3-in, QHD+ (3200×1800), WLED, BrightView ultraslim-flat (2.60-mm), UWVA, (eDP 1.2), TouchScreen display assembly with flush glass design, 72% color gamut; typical brightness: 300 nits; 16:9 ultra wide aspect ratio; equipped with an HD webcam/microphone module 914608-001 Before removing the display assembly, follow these steps: 1. Turn off the computer. If you are unsure whether the computer is off or in Hibernation, turn the computer on, and then shut it down through the operating system. 2. Disconnect the power from the computer by unplugging the power cord from the computer. 3. Disconnect all external devices from the computer. 4. Remove the bottom cover (see Bottom cover on page 20), and then remove the following components: 34 Chapter 5 Removal and replacement procedures
-
 1
1 -
2
-
3
-
4
-
5
-
6
-
7
-
8
-
9
-
10
-
11
-
12
-
13
-
14
-
15
-
16
-
17
-
18
-
19
-
20
-
21
-
22
-
23
-
24
-
25
-
26
-
27
-
28
-
29
-
30
-
31
-
32
-
33
-
34
-
35
-
36
-
 37
37 -
 38
38 -
 39
39 -
 40
40 -
 41
41 -
 42
42 -
 43
43 -
 44
44 -
 45
45 -
 46
46 -
 47
47 -
48
-
49
-
50
-
51
-
52
-
53
-
54
-
55
-
56
-
57
-
58
-
59
-
60
-
61
-
62
-
63
-
64
 |
 |
