HP Elite 7200 Maintenance & Service Guide HP Elite 7200 Series Microtower - Page 123
Table C-11, Network and Sharing Center
 |
View all HP Elite 7200 manuals
Add to My Manuals
Save this manual to your list of manuals |
Page 123 highlights
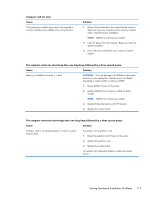
Table C-11 Solving Network Problems Wake-on-LAN feature is not functioning. Cause Wake-on-LAN is not enabled. Solution To enable Wake-on-LAN in Windows XP: 1. Select Start > Control Panel. 2. Double-click Network Connections. 3. Double-click Local Area Connection. 4. Click Properties. 5. Click Configure. 6. Click the Power Management tab, then select the check box to Allow this device to bring the computer out of standby. To enable Wake-on-LAN in Windows Vista: 1. Select Start > Control Panel. 2. Under Network and Internet, select View network status and tasks. 3. In the Tasks list, select Manage network connections. 4. Double-click Local Area Connection. 5. Click the Properties button. 6. Click the Configure button. 7. Click the Power Management tab, then select the check box to Allow this device to wake the computer. To enable Wake-on-LAN in Windows 7: 1. Select Start > Control Panel. 2. Under Network and Sharing Center, click Change adapter settings. 3. Right-click the network connection you want to enable WOL on and click Properties. 4. Click Configure. 5. Select Allow this device to wake the computer. 6. Click OK. Solving Network Problems 115
-
 1
1 -
2
-
3
-
4
-
5
-
6
-
7
-
8
-
9
-
10
-
11
-
12
-
13
-
14
-
15
-
16
-
17
-
18
-
19
-
20
-
21
-
22
-
23
-
24
-
25
-
26
-
27
-
28
-
29
-
30
-
31
-
32
-
33
-
34
-
35
-
36
-
37
-
38
-
39
-
40
-
41
-
42
-
43
-
44
-
45
-
46
-
47
-
48
-
49
-
50
-
51
-
52
-
53
-
54
-
55
-
56
-
57
-
58
-
59
-
60
-
61
-
62
-
63
-
64
-
65
-
66
-
67
-
68
-
69
-
70
-
71
-
72
-
73
-
74
-
75
-
76
-
77
-
78
-
79
-
80
-
81
-
82
-
83
-
84
-
85
-
86
-
87
-
88
-
89
-
90
-
91
-
92
-
93
-
94
-
95
-
96
-
97
-
98
-
99
-
100
-
101
-
102
-
103
-
104
-
105
-
106
-
107
-
108
-
109
-
110
-
111
-
112
-
113
-
114
-
115
-
116
-
117
-
 118
118 -
 119
119 -
 120
120 -
 121
121 -
 122
122 -
 123
123 -
 124
124 -
 125
125 -
 126
126 -
 127
127 -
 128
128 -
129
-
130
-
131
-
132
-
133
-
134
-
135
-
136
-
137
-
138
-
139
-
140
-
141
-
142
-
143
-
144
 |
 |