HP EliteBook 755 User Guide - Page 42
Using HP LAN-WLAN Protection (select products only), Turning on and customizing HP LAN-WLAN Protection
 |
View all HP EliteBook 755 manuals
Add to My Manuals
Save this manual to your list of manuals |
Page 42 highlights
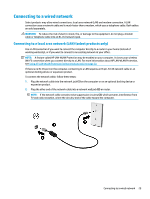
Using HP LAN-WLAN Protection (select products only) In a LAN environment, you can set HP LAN-WLAN Protection to safeguard your LAN network from unauthorized wireless access. When HP LAN-WLAN Protection is enabled, the WLAN (Wi-Fi) connection is turned off when the computer is connected directly to a LAN. Turning on and customizing HP LAN-WLAN Protection 1. Connect a network cable to the network jack on the computer, or on an optional docking device or expansion product. 2. Start Computer Setup (BIOS). ● Computers or tablets with keyboards: ▲ Turn on or restart the computer, and when the HP logo appears, press f10 to enter Computer Setup. ● Tablets without keyboards: ▲ Turn on or restart the tablet, and then quickly hold down the volume down button until the Startup menu is displayed. Tap f10 to enter Computer Setup. 3. Select Advanced, and then select Built-in Device Options. 4. Select the check box for LAN/WLAN Auto Switching to turn off WLAN connections when connected to a LAN network. 5. To save your changes and exit Computer Setup, select the Save icon in the lower-right corner of the screen, and then follow the on-screen instructions. ‒ or - Select Main, select Save Changes and Exit, and then press enter. Your changes go into effect when the computer restarts. Using HP MAC Address Manager to identify your computer on a network (select products only) You can enable a system Media Access Control (MAC) address to provide a customizable way of identifying your computer and its communications on networks. This system MAC address provides unique identification even when your computer is connected through an external device, such as a docking station or external wireless adapter. This address is disabled by default. Turning on and customizing the system MAC address 1. Connect a network cable to the network jack on the computer, or on an optional docking device or expansion product. 2. Start Computer Setup (BIOS). ● Computers or tablets with keyboards: ▲ Turn on or restart the computer, and when the HP logo appears, press f10 to enter Computer Setup. ● Tablets without keyboards: ▲ Turn on or restart the tablet, and then quickly hold down the volume down button until the Startup menu is displayed. Tap f10 to enter Computer Setup. 30 Chapter 3 Network connections
-
 1
1 -
2
-
3
-
4
-
5
-
6
-
7
-
8
-
9
-
10
-
11
-
12
-
13
-
14
-
15
-
16
-
17
-
18
-
19
-
20
-
21
-
22
-
23
-
24
-
25
-
26
-
27
-
28
-
29
-
30
-
31
-
32
-
33
-
34
-
35
-
36
-
 37
37 -
 38
38 -
 39
39 -
 40
40 -
 41
41 -
 42
42 -
 43
43 -
 44
44 -
 45
45 -
 46
46 -
 47
47 -
48
-
49
-
50
-
51
-
52
-
53
-
54
-
55
-
56
-
57
-
58
-
59
-
60
-
61
-
62
-
63
-
64
-
65
-
66
-
67
-
68
-
69
-
70
-
71
-
72
-
73
-
74
-
75
-
76
-
77
-
78
-
79
-
80
-
81
-
82
-
83
-
84
-
85
-
86
-
87
-
88
-
89
-
90
-
91
-
92
-
93
-
94
-
95
 |
 |
