HP EliteBook 8470p HP ProtectTools Getting Started - Page 28
File Sanitizer for HP ProtectTools, Security Manager, File Sanitizer, Settings, Advanced Security
 |
View all HP EliteBook 8470p manuals
Add to My Manuals
Save this manual to your list of manuals |
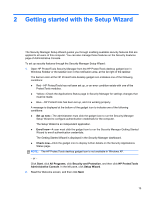
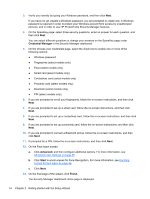
Page 28 highlights
File Sanitizer for HP ProtectTools File Sanitizer is designed to make it very difficult for an unauthorized person to recover data you have deleted. Multiple options allow you to erase manually or to establish a regular schedule to erase selected files and folders, including browser history. To start permanently erasing your deleted data, select the file or folders you no longer need. 1. Navigate to Security Manager > File Sanitizer > Settings. Select Advanced Security Settings, and then click the View Details button. 2. Select the items on the right side of the Available shred options window that you want to permanently delete on a regular basis, and then click the
-
 1
1 -
2
-
3
-
4
-
5
-
6
-
7
-
8
-
9
-
10
-
11
-
12
-
13
-
14
-
15
-
16
-
17
-
18
-
19
-
20
-
21
-
22
-
 23
23 -
 24
24 -
 25
25 -
 26
26 -
 27
27 -
 28
28 -
 29
29 -
 30
30 -
 31
31 -
 32
32 -
 33
33 -
34
-
35
-
36
-
37
-
38
-
39
-
40
-
41
-
42
-
43
-
44
-
45
-
46
-
47
-
48
-
49
-
50
-
51
-
52
-
53
-
54
-
55
-
56
-
57
-
58
-
59
-
60
-
61
-
62
-
63
-
64
-
65
-
66
-
67
-
68
-
69
-
70
-
71
-
72
-
73
-
74
-
75
-
76
-
77
-
78
-
79
-
80
-
81
-
82
-
83
-
84
-
85
-
86
-
87
-
88
-
89
-
90
-
91
-
92
-
93
-
94
-
95
-
96
-
97
-
98
-
99
-
100
-
101
-
102
-
103
-
104
-
105
-
106
-
107
-
108
-
109
-
110
-
111
-
112
-
113
-
114
-
115
-
116
-
117
-
118
-
119
-
120
-
121
-
122
-
123
-
124
-
125
-
126
-
127
-
128
-
129
-
130
-
131
-
132
-
133
-
134
-
135
-
136
-
137
-
138
 |
 |

File Sanitizer for HP ProtectTools
File Sanitizer is designed to make it very difficult for an unauthorized person to recover data you have
deleted. Multiple options allow you to erase manually or to establish a regular schedule to erase
selected files and folders, including browser history.
To start permanently erasing your deleted data, select the file or folders you no longer need.
1.
Navigate to
Security Manager
>
File Sanitizer
>
Settings
. Select
Advanced Security
Settings
, and then click the
View Details
button.
2.
Select the items on the right side of the Available shred options window that you want to
permanently delete on a regular basis, and then click the
<-Add
button to move the selected
items to the Delete side.
3.
Start with Recycle Bin, and then add other items you may want to erase by Shredding.
4.
Click the
Apply
button when you have selected everything you want permanently erased.
5.
Navigate to the
Shred
option, and then select the time when you want the action to take place.
The
Shred Now
button immediately erases the items selected in the Delete Settings window
you just configured.
6.
A small popup bubble is displayed in the task bar each time the Shred is started and when it is
complete.
18
Chapter 3
Easy Setup Guide for Small Business