HP Indigo 30000 CA493-00130 Rev
HP Indigo 30000 Manual
 |
View all HP Indigo 30000 manuals
Add to My Manuals
Save this manual to your list of manuals |
HP Indigo 30000 manual content summary:
- HP Indigo 30000 | CA493-00130 Rev - Page 1
how to service the charge roller unit. Scope Document number Revision number Date Security level HP Indigo 10000 Digital Press, HP Indigo 15K Digital Press, HP Indigo 15K HD Digital Press, HP Indigo 12000 Digital Press, HP Indigo 12000 HD Digital Press, HP Indigo 20000 Digital Press, HP Indigo 25K - HP Indigo 30000 | CA493-00130 Rev - Page 2
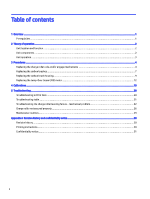
Print Care...20 Troubleshooting table ...21 Troubleshooting the charge roller leveling failure - mechanical problem 22 Charge roller not secured properly...26 Maintenance routines ...29 Appendix A Revision history and confidentiality notice ...30 Revision history ...30 Printing instructions ...30 - HP Indigo 30000 | CA493-00130 Rev - Page 3
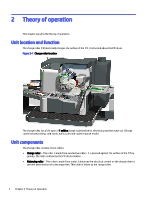
1 Overview An overview of servicing the charge roller unit. Prerequisites Two people are needed for some of the procedures. Overview 1 - HP Indigo 30000 | CA493-00130 Rev - Page 4
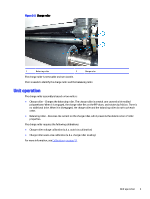
cycles in pause mode.) Unit components The charge roller consists of two rollers: ● Charge roller - This roller is made from conductive rubber. It is pressed against the surface of the PIP by gravity. The roller is driven by the PIP drum rotation. ● Balancing roller - This roller is made from metal - HP Indigo 30000 | CA493-00130 Rev - Page 5
Figure 2-2 Charge roller 1 Balancing roller 2 Charge roller The charge roller is removable and serviceable. The CE needs to identify the charge roller and the balancing roller. Unit operation The charge roller assembly is based on two rollers: ● Charge roller - - HP Indigo 30000 | CA493-00130 Rev - Page 6
for servicing the charge roller unit. Replacing the charge roller rails and/or engage mechanisms This section describes how to remove and replace the charge roller rails and engage mechanisms. Removing the charge roller unit Charge roller unit removal. 1. Turn OFF the PC and shut down the press - HP Indigo 30000 | CA493-00130 Rev - Page 7
following: 1. From the front side of the charge roller, use a 10 mm wrench to rotate and remove both guide pins from the charge roller rails. Figure 3-2 Removing the guide pins 1 Guide pins 2 Notch for 10 mm wrench 3 Front engage mechanism 4 Rail Removing the charge roller rails and engage - HP Indigo 30000 | CA493-00130 Rev - Page 8
these screws, raise the engage mechanism. b. Carefully place the front engage mechanism onto the 2 placement pins on the front press wall. Tighten the 4 M6 Allen screws. 2. Install the rear engage mechanism as follows: a. Insert the 4 original M6 Allen screws into the rear engage mechanism. NOTE - HP Indigo 30000 | CA493-00130 Rev - Page 9
press wall. Tighten the 4 M6 Allen screws. 3. Install the rails, as follows: a. From the front side of charge roller, insert the rear rail in its slot until it reaches the rear engage mechanism. Figure 3-4 Installing guide pin to the rear rail, on the front engage mechanism. d. Tighten the guide pin - HP Indigo 30000 | CA493-00130 Rev - Page 10
3. Unscrew the carbon brush caps. Figure 3-5 Removing the carbon brush caps 4. Access the top of the carbon brush. Figure 3-6 Access the top of the carbon brush 5. Push the carbon brush out of the charge roller unit. Figure 3-7 Pushing the carbon brush out of the charge roller 8 Chapter 3 Procedures - HP Indigo 30000 | CA493-00130 Rev - Page 11
brush into position. Figure 3-8 Carbon brush 7. Install the carbon brush cap. 8. Repeat the above procedure for the second carbon brush. 9. Reinstall the rubber charge roller from the charge roller assembly. 10. Reinstall the charge roller assembly to the press. Replacing the carbon brush housing Do - HP Indigo 30000 | CA493-00130 Rev - Page 12
4. Access the top of the carbon brush. Figure 3-10 Access the top of the carbon brush 5. Remove the carbon brushes. Figure 3-11 Pushing the carbon brush out of the charge roller 6. Remove the top screws from the charge roller assembly end cap. Figure 3-12 Removing top screws 10 Chapter 3 Procedures - HP Indigo 30000 | CA493-00130 Rev - Page 13
7. Remove the side screws from the charge roller assembly end cap. Figure 3-13 Removing side screws 8. Lift the cover of the end cap and lift the 2 leaf springs off of the carbon brush housings. Figure 3-14 Lifting end cap cover 9. Remove the cover from the end cap. Figure 3-15 Removing the end cap - HP Indigo 30000 | CA493-00130 Rev - Page 14
carbon brush housings 13. Return the end cap cover. 14. Install the carbon brushes. 15. Return the brush caps. 16. Reinstall the rubber charge roller from the charge roller assembly. 17. Reinstall the charge roller assembly to the press. Replacing the Jump-Over-Seam (JOS) motor Each charge roller - HP Indigo 30000 | CA493-00130 Rev - Page 15
3. Remove the four Allen screws that attach the JOS motor to the charge roller assembly. Figure 3-18 JOS motor screws 4. Remove the back panel to access the motor connectors. Figure 3-19 Removing the back panel Replacing the Jump-Over-Seam (JOS) motor 13 - HP Indigo 30000 | CA493-00130 Rev - Page 16
5. Disconnect the motor connector. Figure 3-20 Motor connector 6. Remove the motor from the charge roller assembly. Figure 3-21 JOS motor 14 Chapter 3 Procedures - HP Indigo 30000 | CA493-00130 Rev - Page 17
position using the four Allen screws. 11. Reinstall the rubber charge roller from the charge roller assembly. 12. Reinstall the charge roller assembly to the press. Replacing the Jump-Over-Seam (JOS) motor 15 - HP Indigo 30000 | CA493-00130 Rev - Page 18
13. Remove the charge roller from the housing Figure 3-23 Removing charge roller from housing 16 Chapter 3 Procedures - HP Indigo 30000 | CA493-00130 Rev - Page 19
14. Remove the front endcap by removing the 2 screws near the motor with a 3mm hex key. Remove the rear endcap by removing the 2 screws on the back with a 2.5mm hex key. Figure 3-24 Removing the endcaps 15. Remove the 5 screws on the side of the endcap with a Philips screwdriver. Figure 3-25 - HP Indigo 30000 | CA493-00130 Rev - Page 20
16. Gently pull the endcap away from the housing. Be careful not to damage the wires. Once you have removed the endcap, remove the balancing roller and reinstall the new unit. Gently insert the balancing roller into the bearings. It should fit into the bearings easily without applying force. Figure - HP Indigo 30000 | CA493-00130 Rev - Page 21
voltage. Clean the balancing and charge rollers every 150K impressions using the supplied water based wipes. ● Using Pause mode frequently with the press on (where the charge roller remains active), increases "wasted charge cycles", reducing the life-span of the charge roller. Charge roller seam - HP Indigo 30000 | CA493-00130 Rev - Page 22
in Print Care Print Care has a set of tests to troubleshoot and identify the cause of a problem. ● Select Print Care > Diagnostics and Troubleshooting > Diagnostics > Tests (the second tab) > Engine > Charge Roller. ● For the charge roller, there are element activations to help you see - HP Indigo 30000 | CA493-00130 Rev - Page 23
carbon brushes are good. - Make sure that the charge roller is installed. - Make sure that the charge roller leveling process is successfully completed. 1. Run the charge roller leveling. Select Print Care > Diagnostic and Troubleshooting > Tests (the second tab) > Engine > Charge Roller > Leveling - HP Indigo 30000 | CA493-00130 Rev - Page 24
. Make sure there is no residues. (You do not need to remove the motor.) Troubleshooting the charge roller leveling failure - mechanical problem Do the following: 1. Make sure that the PIP foil is correctly installed. Make sure that the PIP foil is clean and smooth. 2. Clean the balancing roller - HP Indigo 30000 | CA493-00130 Rev - Page 25
. ● Make sure that BypassTableTopic > crJosCalibration is False. ● Make sure that BypassTableTopic > crJosJumps is False. 10. Check the charge roller wiring at the press side: ● Check charge roller engage side - Wire W137. Troubleshooting the charge roller leveling failure - mechanical problem 23 - HP Indigo 30000 | CA493-00130 Rev - Page 26
● Check the PIP seam stepper (PSS) - 2 Molex connectors. ● Check that the PSS is connected to the CANBUS wiring. 11. Verify that the PIP seam stepper (PSS) is defined in boot engine control manager (ECM): S:\Indigo\bin\eFW\boot_ecm.cmd 24 Chapter 5 Troubleshooting - HP Indigo 30000 | CA493-00130 Rev - Page 27
the PIP Seam Stepper (PSS) controller. ● Replace the low voltage wiring (PSS - W137 CRE). ● Replace the charge roller housing. Run the Force Level Calibration wizard. Troubleshooting the charge roller leveling failure - mechanical problem 25 - HP Indigo 30000 | CA493-00130 Rev - Page 28
5-3 Charge roller rear guide rail screws Securing the charge roller This is a solution for the charge roller securing issue. This is a possible solution for the "1/2 dark page" print quality issue. Diagnosing the issue Do the following: 1. Change the press status to Off. 26 Chapter 5 Troubleshooting - HP Indigo 30000 | CA493-00130 Rev - Page 29
the issue on page 27. If not, the issue does not exist on the press. Figure 5-4 Incorrect Figure 5-5 Correct Solving the issue Do the following: 1. Turn off the press software. 2. Turn off the press. 3. Do the lockout/tagout procedure. 4. Open the engine front door. 5. Remove the charge roller - HP Indigo 30000 | CA493-00130 Rev - Page 30
Figure 5-6 Rail screws 7. Install the three grounding cables in place. Figure 5-7 Grounding cables 8. Reinstall the charge roller in the engine. 9. Close the engine front door. 10. Undo the lockout/tagout procedure. 11. Turn on the press. 12. Turn on the press software. 28 Chapter 5 Troubleshooting - HP Indigo 30000 | CA493-00130 Rev - Page 31
Maintenance routines There are daily maintenance routines for the charge roller. Make sure that all of the maintenance routines were done properly: 1. Ask the operator to show you the hardcopy for Excellence Routines Maintenance Checklist (CA494-16060). Make sure that everything is checked. If the - HP Indigo 30000 | CA493-00130 Rev - Page 32
-00130 Rev03 CA493-00130 Rev04 Description Initial document Added HP Indigo 20000 Digital Press and HP Indigo 30000 Digital Press to the scope Added the following chapters: "Theory of operation", "Calibrations", and "Troubleshooting" Added: Charge roller not secured properly Added: Balancing roller - HP Indigo 30000 | CA493-00130 Rev - Page 33
document. This document contains valuable trade secrets and confidential information of HP. Nothing herein may be copied, reproduced or distributed in any form to any third party in any manner, without prior written authorization of HP. The copyright notice, which appears in this document, is purely
-
 1
1 -
 2
2 -
 3
3 -
 4
4 -
 5
5 -
 6
6 -
 7
7 -
8
-
9
-
10
-
11
-
12
-
13
-
14
-
15
-
16
-
17
-
18
-
19
-
20
-
21
-
22
-
23
-
24
-
25
-
26
-
27
-
28
-
29
-
30
-
31
-
32
-
33
 |
 |
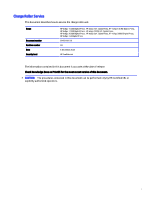
Charge Roller Service
This document describes how to service the charge roller unit.
Scope
HP Indigo 10000 Digital Press, HP Indigo 15K Digital Press, HP Indigo 15K HD Digital Press,
HP Indigo 12000 Digital Press, HP Indigo 12000 HD Digital Press,
HP Indigo 20000 Digital Press, HP Indigo 25K Digital Press, HP Indigo 30000 Digital Press,
HP Indigo 35K Digital Press.
Document number
CA493-00130
Revision number
04
Date
6 December 2023
Security level
HP Confidential
The information contained in this document is accurate at the date of release.
Check Knowledge Zone on PrintOS for the most recent version of this document.
CAUTION:
The procedures contained in this document can be performed only by HP-Certified CEs or
explicitly authorized operators.
i