HP Indigo W7250 ITM Bearings Alignment - Page 8
Removing press components for access, Removing components from the front of press
 |
View all HP Indigo W7250 manuals
Add to My Manuals
Save this manual to your list of manuals |
Page 8 highlights
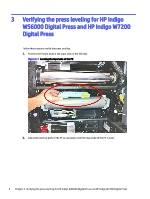
4 Removing press components for access Put all small disassembled components and screws into plastic caps. Use the plastic caps to keep the components organized. Removing components from the front of press Removal of components from the front of press. 1. Turn off the main power switchDisconnect the UPS and the main power at the wall until instructed otherwise in this document. 2. At the press front, remove the following components as shown in the figures below: a. External heater lamps and hood b. Cleaning station and charge roller c. For the HP Indigo 7000 Digital Press: Exit blanket ventilation, PTE unit, and exit roller unit ● For the HP Indigo WS6000 Digital Press: Air knives, PTE, and safety cover net. 6 Chapter 4 Removing press components for access
-
 1
1 -
2
-
 3
3 -
 4
4 -
 5
5 -
 6
6 -
 7
7 -
 8
8 -
 9
9 -
 10
10 -
 11
11 -
 12
12 -
 13
13 -
14
-
15
-
16
-
17
-
18
-
19
-
20
-
21
-
22
-
23
-
24
-
25
-
26
-
27
-
28
-
29
-
30
-
31
-
32
-
33
-
34
-
35
-
36
-
37
-
38
-
39
-
40
-
41
-
42
 |
 |
