HP J6480 User Guide - Page 17
Connection information, Name and Description - power cable
 |
UPC - 883585506811
View all HP J6480 manuals
Add to My Manuals
Save this manual to your list of manuals |
Page 17 highlights
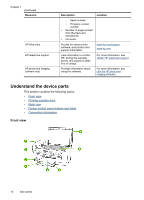
(continued) Label 13 14 15 16 17 18 19 20 21 22 23 24 25 26 27 28 Name and Description START FAX Black: Starts a black-and-white fax job. START FAX Color: Starts a color fax job. One-touch speed-dial buttons: Access the first five speed-dial numbers. Power: Turns the device on or off. The Power button is lit when the device is on. The light blinks while performing a job. When the device is turned off, a minimal amount of power is still supplied. To completely disconnect the power supply, turn the device off, and then unplug the power cord. Auto answer light: When this is lit, the device automatically answers incoming phone calls. When off, the device does not answer any incoming fax calls. Auto Answer: When this button is lit, the device automatically answers incoming phone calls. When off, the device does not answer any incoming fax calls. The button name and functionality depends on the country/region in which the device is sold. Resolution: Adjusts the resolution for the fax you are sending. Junk Fax Blocker: Presents the Junk Fax Blocker Set Up menu for managing unwanted fax calls. You are required to subscribe to a caller ID service to use this feature. Redial/Pause: Redial the most recently dialed number, or insert a 3-second pause in a fax number. Fax Menu: Presents the Fax menu for selecting fax options. Keypad: Enters values. Attention light: When blinking, the attention light indicates an error has occurred that requires your attention. Display: View menus and messages. Print cartridge indicators: Indicates which print cartridge needs servicing. Quality: Selects Best, Normal, or Fast quality for copying. Copy Menu: Presents the Copy menu for selecting options. Photo Menu: Presents the Photo menu for selecting options. Connection information Description USB connection Ethernet (wired) connection Recommended number of connected computers for best performance One computer connected with a USB cable to the rear USB 2.0 high-speed port on the device. Up to five computers connected to the device using a hub or router. Supported software features All features are supported. All features are supported, including Webscan. Setup instructions Follow the setup poster guide for detailed instructions. Follow the instructions in the getting started Understand the device parts 13
-
 1
1 -
2
-
3
-
4
-
5
-
6
-
7
-
8
-
9
-
10
-
11
-
 12
12 -
 13
13 -
 14
14 -
 15
15 -
 16
16 -
 17
17 -
 18
18 -
 19
19 -
 20
20 -
 21
21 -
 22
22 -
23
-
24
-
25
-
26
-
27
-
28
-
29
-
30
-
31
-
32
-
33
-
34
-
35
-
36
-
37
-
38
-
39
-
40
-
41
-
42
-
43
-
44
-
45
-
46
-
47
-
48
-
49
-
50
-
51
-
52
-
53
-
54
-
55
-
56
-
57
-
58
-
59
-
60
-
61
-
62
-
63
-
64
-
65
-
66
-
67
-
68
-
69
-
70
-
71
-
72
-
73
-
74
-
75
-
76
-
77
-
78
-
79
-
80
-
81
-
82
-
83
-
84
-
85
-
86
-
87
-
88
-
89
-
90
-
91
-
92
-
93
-
94
-
95
-
96
-
97
-
98
-
99
-
100
-
101
-
102
-
103
-
104
-
105
-
106
-
107
-
108
-
109
-
110
-
111
-
112
-
113
-
114
-
115
-
116
-
117
-
118
-
119
-
120
-
121
-
122
-
123
-
124
-
125
-
126
-
127
-
128
-
129
-
130
-
131
-
132
-
133
-
134
-
135
-
136
-
137
-
138
-
139
-
140
-
141
-
142
-
143
-
144
-
145
-
146
-
147
-
148
-
149
-
150
-
151
-
152
-
153
-
154
-
155
-
156
-
157
-
158
-
159
-
160
-
161
-
162
-
163
-
164
-
165
-
166
-
167
-
168
-
169
-
170
-
171
-
172
-
173
-
174
-
175
-
176
-
177
-
178
-
179
-
180
-
181
-
182
-
183
-
184
-
185
-
186
-
187
-
188
-
189
-
190
-
191
-
192
-
193
-
194
-
195
-
196
-
197
-
198
-
199
-
200
-
201
-
202
-
203
-
204
-
205
-
206
-
207
-
208
-
209
-
210
-
211
-
212
-
213
-
214
-
215
-
216
-
217
-
218
 |
 |