HP KVM CAT5 1x1x16 HP IP and Server Console Switches G2 User Guide - Page 37
DNS settings, Unit View>Appliance>Appliance Settings>DNS, Enable NTP
 |
View all HP KVM CAT5 1x1x16 manuals
Add to My Manuals
Save this manual to your list of manuals |
Page 37 highlights
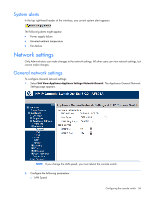
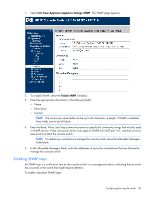
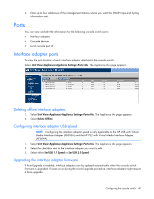
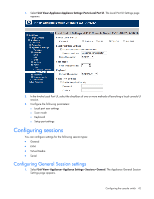
o ICMP Ping Reply o HTTP Port o HTTPS Port 3. Configure the network settings for either IPv4 or IPv6 mode. The default setting is IPv4 with BOOTP enabled. The console switch is dual-stack capable, so both can be configured simultaneously. DNS settings To configure DNS settings: 1. Select Unit View>Appliance>Appliance Settings>DNS. The Appliance DNS Settings page appears. 2. Select the DNS Assignment Mode: o Manual o BOOTP o DHCPv6 3. Enter the DNS server addresses in the Primary, Secondary, and Tertiary fields. NTP settings To configure NTP settings: 1. Select Unit View>Appliance>Appliance Settings>NTP. The NTP page appears. 2. To enable NTP, select the Enable NTP checkbox. 3. Enter the name/address of the NTP servers in the NTP Server 1 and NTP Server 2 fields. 4. To enable the update interval, select the checkbox, and select the number of minutes for the update interval. SNMP settings SNMP is a protocol used to communicate management information between network management applications and the console switch. Other SNMP managers can communicate with your switch by accessing MIB-II and the public portion of the enterprise MIB. You can designate which stations can manage the switch as well as receive SNMP traps from the switch. If you enable SNMP, the console switch responds to all SNMP requests over UDP port 161. To configure your SNMP settings: Configuring the console switch 37
-
 1
1 -
2
-
3
-
4
-
5
-
6
-
7
-
8
-
9
-
10
-
11
-
12
-
13
-
14
-
15
-
16
-
17
-
18
-
19
-
20
-
21
-
22
-
23
-
24
-
25
-
26
-
27
-
28
-
29
-
30
-
31
-
 32
32 -
 33
33 -
 34
34 -
 35
35 -
 36
36 -
 37
37 -
 38
38 -
 39
39 -
 40
40 -
 41
41 -
 42
42 -
43
-
44
-
45
-
46
-
47
-
48
-
49
-
50
-
51
-
52
-
53
-
54
-
55
-
56
-
57
-
58
-
59
-
60
-
61
-
62
-
63
-
64
-
65
-
66
-
67
-
68
-
69
-
70
-
71
-
72
-
73
-
74
-
75
-
76
-
77
-
78
-
79
-
80
-
81
-
82
-
83
 |
 |
