HP KVM CAT5 3x1x16 HP IP and Server Console Switches G2 User Guide - Page 16
Slide the console switch into the rear of the 1U product.
 |
View all HP KVM CAT5 3x1x16 manuals
Add to My Manuals
Save this manual to your list of manuals |
Page 16 highlights
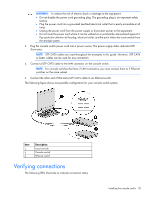
2. Attach the long 1U brackets to the console switch using four of the screws you removed. Discard the two remaining screws. 3. If not already installed, install a cage nut behind each rear rail. 4. Slide the console switch into the rear of the 1U product. 5. Secure the console switch to the rails using two M-6 screws, one on each side. Installing the console switch 16
-
 1
1 -
2
-
3
-
4
-
5
-
6
-
7
-
8
-
9
-
10
-
 11
11 -
 12
12 -
 13
13 -
 14
14 -
 15
15 -
 16
16 -
 17
17 -
 18
18 -
 19
19 -
 20
20 -
 21
21 -
22
-
23
-
24
-
25
-
26
-
27
-
28
-
29
-
30
-
31
-
32
-
33
-
34
-
35
-
36
-
37
-
38
-
39
-
40
-
41
-
42
-
43
-
44
-
45
-
46
-
47
-
48
-
49
-
50
-
51
-
52
-
53
-
54
-
55
-
56
-
57
-
58
-
59
-
60
-
61
-
62
-
63
-
64
-
65
-
66
-
67
-
68
-
69
-
70
-
71
-
72
-
73
-
74
-
75
-
76
-
77
-
78
-
79
-
80
-
81
-
82
-
83
 |
 |

Installing the console switch
16
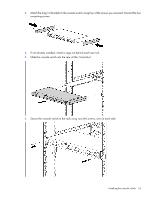
2.
Attach the long 1U brackets to the console switch using four of the screws you removed. Discard the two
remaining screws.
3.
If not already installed, install a cage nut behind each rear rail.
4.
Slide the console switch into the rear of the 1U product.
5.
Secure the console switch to the rails using two M-6 screws, one on each side.