HP Kayak XA 05xx HP Kayak XA Series 05xx, Accessories Installation Guide For M
HP Kayak XA 05xx Manual
 |
View all HP Kayak XA 05xx manuals
Add to My Manuals
Save this manual to your list of manuals |
HP Kayak XA 05xx manual content summary:
- HP Kayak XA 05xx | HP Kayak XA Series 05xx, Accessories Installation Guide For M - Page 1
HP Kayak XA 05xx PC Workstation- Installing Accessories In Your HP Minitower PC Workstation Explains in detail how to install accessories, such as extra memory, accessory boards, and additional disk drives. - HP Kayak XA 05xx | HP Kayak XA Series 05xx, Accessories Installation Guide For M - Page 2
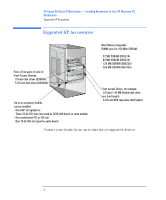
HP Kayak XA 05xx PC Workstation - Installing Accessories In Your HP Minitower PC Workstation Supported HP Accessories Supported HP Accessories Pack of five pairs of rails for Front Access Devices: - 3.5-inch disk drives (D3566A) - 5.25-inch disk drives (D2880A) Up to six accessory - HP Kayak XA 05xx | HP Kayak XA Series 05xx, Accessories Installation Guide For M - Page 3
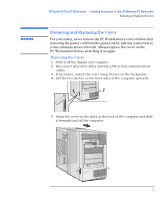
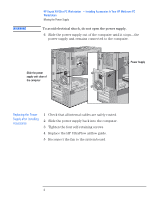
WARNING HP Kayak XA 05xx PC Workstation - Installing Accessories In Your HP Minitower PC Workstation Removing and Replacing the Cover Removing and Replacing the Cover For your safety, never remove the PC Workstation's cover without first removing the power cord from the power outlet, and any - HP Kayak XA 05xx | HP Kayak XA Series 05xx, Accessories Installation Guide For M - Page 4
front sides of the cover are lifted up, and that the lock is unlocked. 3 Slide the cover onto the computer, making sure that the two guides at the bottom of the case slide into the two rails at the base of the computer. Firmly slide the cover backwards into position. Step - HP Kayak XA 05xx | HP Kayak XA Series 05xx, Accessories Installation Guide For M - Page 5
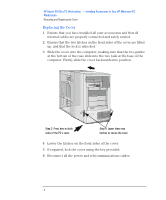
3). 3 Remove the fan connection to the system board. Fan connection to system board HP UltraFlow Airflow Guide Retaining button 4 Press the retaining buttons on each side of the HP UltraFlow airflow guide and lift it out of the PC Workstation's case. 5 Unscrew the four self-retaining screws at the - HP Kayak XA 05xx | HP Kayak XA Series 05xx, Accessories Installation Guide For M - Page 6
all internal cables are safely routed. 2 Slide the power supply back into the computer. 3 Tighten the four self-retaining screws. 4 Replace the HP UltraFlow airflow guide. 5 Reconnect the fan to the system board. 6 English - HP Kayak XA 05xx | HP Kayak XA Series 05xx, Accessories Installation Guide For M - Page 7
board (see the illustration on page 5). 4 Press the retaining buttons on each side of the HP UltraFlow airflow guide and lift it out of the PC Workstation's case. 5 Remove the airflow guide covering the processor sockets (if needed). 6 Remove the transparent SCSI holder to provide easy access to the - HP Kayak XA 05xx | HP Kayak XA Series 05xx, Accessories Installation Guide For M - Page 8
HP Kayak XA 05xx PC Workstation - Installing Accessories In Your HP Minitower PC Workstation Installing Memory 7 The location of the memory module slots is shown here. 8 Slide the memory module into the slot at 90° to the system board (with the cutouts furthest away from the processor). Slide the - HP Kayak XA 05xx | HP Kayak XA Series 05xx, Accessories Installation Guide For M - Page 9
HP Kayak XA 05xx PC Workstation - Installing Accessories In Your HP Minitower PC Workstation Installing Memory 11 Install any other accessories if necessary, then replace all units and reconnect all cables and power cords. Replace the cover (see page 4). 12 Check the HP Summary Screen to verify the - HP Kayak XA 05xx | HP Kayak XA Series 05xx, Accessories Installation Guide For M - Page 10
HP Kayak XA 05xx PC Workstation - Installing Accessories In Your HP Minitower PC Workstation Installing Mass Storage Devices Installing Mass Storage Devices Connecting Devices If you add an IDE Zip drive, hard disk drive, CD-ROM drive, CD-RW drive, or tape drive, you need to connect it to power and - HP Kayak XA 05xx | HP Kayak XA Series 05xx, Accessories Installation Guide For M - Page 11
SCSI ID for Plug and Play SCSI hard disks (SCSI hard disks that support the SCAM protocol). You should assign an unused SCSI ID to the second configured with jumpers on the SCSI hard disk drive. Refer to the installation guide supplied with the drive for information on selecting a SCSI ID. Some - HP Kayak XA 05xx | HP Kayak XA Series 05xx, Accessories Installation Guide For M - Page 12
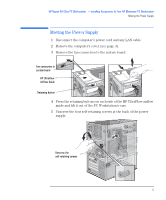
- Installing Accessories In Your HP Minitower PC Workstation Installing Mass Storage Devices 4 Press the retaining buttons on each side of the HP UltraFlow airflow guide and lift it out of the PC Workstation's case. 5 Slide the power supply out to improve access to the internal shelf (see page - HP Kayak XA 05xx | HP Kayak XA Series 05xx, Accessories Installation Guide For M - Page 13
HP Kayak XA 05xx PC Workstation - Installing Accessories In Your HP Minitower PC Workstation Installing Mass Storage Devices 8 Locate the appropriate data cable for the hard disk drive. IDE drives should be connected to a free IDE connector on the IDE cables (you can add up to four IDE devices). Up - HP Kayak XA 05xx | HP Kayak XA Series 05xx, Accessories Installation Guide For M - Page 14
(see page 3). 3 Remove the fan connection to the system board (see on page 5). 4 Press the retaining buttons on each side of the HP UltraFlow airflow guide and lift it out of the PC Workstation's case. 5 Slide out the power supply to provide better access to the disk drive cables (see page - HP Kayak XA 05xx | HP Kayak XA Series 05xx, Accessories Installation Guide For M - Page 15
HP Kayak XA 05xx PC Workstation - Installing Accessories In Your HP Minitower PC Workstation Installing Mass Storage Devices 8 Slide the drive tray into the drive shelf and secure it. Slide the drive tray into the drive shelf 9 Locate the appropriate data cable for the disk drive. IDE drives - HP Kayak XA 05xx | HP Kayak XA Series 05xx, Accessories Installation Guide For M - Page 16
selfretaining screws (see page 6). 13 Replace the HP UltraFlow airflow guide and reconnect the fan to the system board (see the illustration on replacing the cover and completing the installation. 15 Follow the instructions below to complete the installation. Completing the Installation of a Hard - HP Kayak XA 05xx | HP Kayak XA Series 05xx, Accessories Installation Guide For M - Page 17
, or a tape drive) in one of the front-access drive shelves. You should also refer to the manual supplied with the drive for any additional installation instructions. Refer to the drive's installation guide to see if you must set jumpers or if there is a special installation procedure to follow. If - HP Kayak XA 05xx | HP Kayak XA Series 05xx, Accessories Installation Guide For M - Page 18
HP Kayak XA 05xx PC Workstation - Installing Accessories In Your HP Minitower PC Workstation Installing Mass Storage Devices 3 Slide out the power supply to provide better access to the disk drive cables (see page 5). 4 If installing a drive in a 5.25-inch wide shelf, remove the drive tray and put - HP Kayak XA 05xx | HP Kayak XA Series 05xx, Accessories Installation Guide For M - Page 19
HP Kayak XA 05xx PC Workstation - Installing Accessories In Your HP Minitower PC Workstation Installing Mass Storage Devices 7 Locate the appropriate data cable for the device. Flexible Disk Drive Cable Up to 15 SCSI devices can be connected to the internal and external SCSI connectors. IDE drives - HP Kayak XA 05xx | HP Kayak XA Series 05xx, Accessories Installation Guide For M - Page 20
HP Kayak XA 05xx PC Workstation - Installing Accessories In Your HP Minitower PC Workstation Installing Mass Storage Devices 10 Slide the power supply back into position, and tighten the four selfretaining screws (see page 6). 11 Remove the plastic panel from the cover by pulling the panel from the - HP Kayak XA 05xx | HP Kayak XA Series 05xx, Accessories Installation Guide For M - Page 21
empty slot. Identify the location of the slot type you want to use(ISA or PCI). Some boards may have preferred locations and special installation instructions detailed in their manuals. English 21 - HP Kayak XA 05xx | HP Kayak XA Series 05xx, Accessories Installation Guide For M - Page 22
the screws on the adjacent slots. Unscrew and remove the slot cover 5 Hold the board horizontally by its "top" edge. Slide it into the board guide of the chosen slot. Do not bend the board. Slide the accessory board into position 6 Align the board's connector with the slot's socket. Firmly press - HP Kayak XA 05xx | HP Kayak XA Series 05xx, Accessories Installation Guide For M - Page 23
HP Kayak XA 05xx PC Workstation - Installing Accessories In Your HP Minitower PC Workstation Installing Accessory Boards 7 Secure the board by replacing the slot cover screw. If you loosened the screws on adjacent slots, remember to tighten them. Secure the board in position 8 Install any other
-
 1
1 -
 2
2 -
 3
3 -
 4
4 -
 5
5 -
 6
6 -
 7
7 -
8
-
9
-
10
-
11
-
12
-
13
-
14
-
15
-
16
-
17
-
18
-
19
-
20
-
21
-
22
-
23
 |
 |

HP Kayak XA 05xx PC Workstation—
Installing Accessories
In Your HP Minitower PC Workstation
Explains in detail how to install accessories, such as extra memory,
accessory boards, and additional disk drives.