HP Kayak XU 04xx HP Kayak XU Series 04xx, Accessories Installation Guide - Page 11
Install any other accessories before completing the installation.
 |
View all HP Kayak XU 04xx manuals
Add to My Manuals
Save this manual to your list of manuals |
Page 11 highlights
HP Kayak XU PC Workstation - Installing Accessories In Your HP PC Workstation Installing Mass Storage Devices 5 Secure the drive with the four self-retaining screws. 6 Locate the appropriate data cable for the hard disk drive (refer to page 8). 7 Connect the power cable and the data cable to the rear of the drive. (The connectors are shaped to go in one way only.) Data Cable Power Cable 8 Replace the HP UltraFlow airflow guide (refer to page 5). 9 Install any other accessories before completing the installation. 10 Refer to "Completing the Installation of a Hard Disk Drive" on page 14 to complete the installation. English 11
-
 1
1 -
2
-
3
-
4
-
5
-
 6
6 -
 7
7 -
 8
8 -
 9
9 -
 10
10 -
 11
11 -
 12
12 -
 13
13 -
 14
14 -
 15
15 -
 16
16 -
17
-
18
-
19
-
20
-
21
-
22
-
23
-
24
 |
 |

English
11
HP Kayak XU PC Workstation
— Installing Accessories In Your HP PC Workstation
Installing Mass Storage Devices
5
Secure the drive with the four self-retaining screws.
6
Locate the appropriate data cable for the hard disk drive (refer to
page 8).
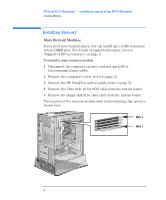
7
Connect the power cable and the data cable to the rear of the drive.
(
The connectors are shaped to go in one way only
.)
8
Replace the HP UltraFlow airflow guide (refer to page 5).
9
Install any other accessories before completing the installation.
10
Refer to “Completing the Installation of a Hard Disk Drive” on page
14 to complete the installation.
Data Cable
Power Cable