HP Kayak XU 04xx HP Kayak XU Series 04xx, Accessories Installation Guide - Page 9
Disk Striping, Before Installing an, IDE Hard Disk, When the Adaptec
 |
View all HP Kayak XU 04xx manuals
Add to My Manuals
Save this manual to your list of manuals |
Page 9 highlights
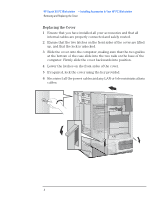
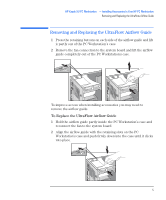
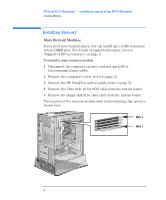
HP Kayak XU PC Workstation - Installing Accessories In Your HP PC Workstation Installing Mass Storage Devices Disk Striping Before Installing an IDE Hard Disk Before Installing a SCSI Hard Disk NOTE To achieve top performance through disk striping, a RAIDport™ is provided on the system board aligned with PCI socket 3. When the Adaptec® FastRAID2 accessory is installed in the PCI socket and RAIDport, the adapter sets up and accelerates disk striping on hard disks connected to the internal UltraWide 16-bit SCSI controller. The Adaptec® RAIDport adapter should be used with one or more stripped hard disks. For more information, refer to the "HP FastRAID Installation and Configuration Guide" that came with your FastRAID2 accessory. Refer to the drive's installation guide to see if you must set jumpers or if there is a special installation procedure to follow. If you are installing an additional SCSI drive, you should assign an unused SCSI ID to this accessory. SCSI IDs range from 0 to 6 for Ultra narrow 8-bit SCSI and from 0 to 15 for Ultra wide 16-bit SCSI. SCSI ID 0 is used by the first SCSI hard disk drive and SCSI ID 7 is reserved for the integrated SCSI controller (the default for narrow and wide SCSI devices). Depending on your operating system, you may need to set a SCSI ID for Plug and Play devices (SCSI devices that support the SCAM protocol). If HP FastRAID is installed, you will need to set a SCSI ID. You should assign an unused SCSI ID to the second SCSI hard disk drive (for example, SCSI ID 1). The SCSI ID is usually configured with jumpers on the SCSI hard disk drive. Refer to the installation guide supplied with the drive for information on selecting a SCSI ID. Some internal SCSI disk drives may have termination resistors that must be removed or disabled before installation in your computer. Refer to the drive's installation guide for more details and to see if there is a special installation procedure to follow. English 9
-
 1
1 -
2
-
3
-
 4
4 -
 5
5 -
 6
6 -
 7
7 -
 8
8 -
 9
9 -
 10
10 -
 11
11 -
 12
12 -
 13
13 -
 14
14 -
15
-
16
-
17
-
18
-
19
-
20
-
21
-
22
-
23
-
24
 |
 |
