HP Kayak XU 04xx HP Kayak XU Series 04xx, Chassis Component Replacement Instru - Page 7
Replacing the Hard Disk Fan
 |
View all HP Kayak XU 04xx manuals
Add to My Manuals
Save this manual to your list of manuals |
Page 7 highlights
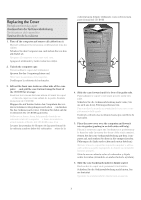
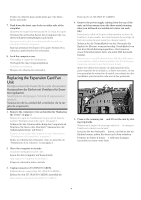
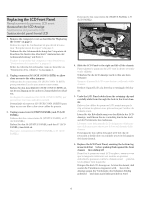
Rimettere il pannello LCD, controllando che la linguetta in basso sia inserita prima ‚ di spingerla contro lo chassis ƒ e spostarla a sinistra „. Vuelva a colocar el panel frontal LCD, asegurándose que la pestaña inferior se inserta primero ‚ antes de presionarlo contra el chasis frontal ƒ y deslizarlo a la izquierda „. ƒ „ ‚ Togliere il coperchio dal computer come descritto in "Sostituzione del coperchio" a pagina 3. Retire la cubierta del ordenador como se describe en "Sustitución de la cubierta" en la página 3. 2. Unplug J33 (FAN PROG) and remove the Ultra Flow Cooling System. Débranchez J33 (FAN PROG) et retirez le système de refroidissement Ultra Flow. Ziehen Sie J33 (FAN PROG) ab, und entfernen Sie das Ultra Flow Kühlungssystem. Scollegare J33 (FAN PROG) e rimuovere il sistema di raffreddamento Ultra Flow. Desenchufe J33 (FAN PROG) y quite el sistema de refrigeración de flujo de aire. 7. Connect J4 (STATUS PANEL) and J7 (LCD PANEL), and fold away any loose cabling into the retaining clip. Branchez J4 (STATUS PANEL) et J7 (LCD PANEL), puis serrez tout câble gênant dans le clip. Schließen Sie den J4 (STATUS PANEL) und den J7 (LCD PANEL) Anschluß an, und befestigen Sie lose Kabel an der Kabelhalterung. Collegare i connettori J4 (STATUS PANEL) e J7 (LCD PANEL) e fissare ogni cavo volante con il suo fermo. Conecte el J4 (STATUS PANEL) y J7 (LCD PANEL) y coloque cualquier cable suelto en el clip de retención. 8. Refit the computer cover. Remettez le capot de l'ordinateur en place. Bringen Sie die Gehäuseabdeckung des Computers wieder an. Rimettere il coperchio sul computer. Vuelva a ajustar la cubierta del ordenador. Replacing the Hard Disk Fan Remplacement du ventilateur du disque dur Austauschen des Festplattenventilators Sostituzione della ventola del disco rigido Sustitución del ventilador del disco duro 1. Remove the computer cover as described in "Replacing the Cover" on page 3. Retirez le capot de l'ordinateur tel que décrit à la section "Remplacement du capot" à la page 3. Nehmen Sie die Gehäuseabdeckung des Computers ab. Beachten Sie hierzu den Abschnitt "Austauschen der Gehäuseabdeckung" auf Seite 3. ƒ ‚ J33 3. Remove any hard disk(s) by unscrewing the retaining screws. Enlevez les vis de fixation pour retirer tous les disques durs installés. Bauen Sie sämtliche Festplatten aus. Lösen Sie hierfür die Schrauben. Togliere tutte le unità disco rigido svitandone le viti di fissaggio. Retire cualquier disco duro destornillando los tornillos de retención. 4. Disconnect J3 (HDD FAN). Débranchez J3 (HDD FAN). Ziehen Sie den J3 (HDD FAN) Anschluß ab. Staccare il connettore J3 (HDD FAN). Desconecte el J3 (HDD FAN). 5. With a sharp blade cut the four retaining stubs holding the fan in place. Coupez les quatre tiges maintenant le ventilateur en place à l'aide d'un objet aiguisé. 7
-
 1
1 -
 2
2 -
 3
3 -
 4
4 -
 5
5 -
 6
6 -
 7
7 -
 8
8 -
 9
9 -
 10
10 -
 11
11 -
 12
12
 |
 |
