HP Kayak XW U3-W3 HP 10BT/100TX Night Director/100 Ethernet Card Installation - Page 16
User's Guide, slot's retaining bracket, which can be found at the back of the PC.
 |
View all HP Kayak XW U3-W3 manuals
Add to My Manuals
Save this manual to your list of manuals |
Page 16 highlights
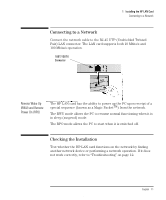
1 Installing the HP LAN Card Installing the HP LAN Card Installing the HP LAN Card For complete information on how to install an accessory card (or board), refer to your PC User's Guide. The following steps are given as a guide. 1 With the PC turned off, disconnect the power cord and any connection to a telecommunications network, and then remove the cover. 2 Depending on the PC model, you may need to remove the accessory slot's retaining bracket, which can be found at the back of the PC. 3 Remove the slot cover. 4 Connect the External Start cable and, without bending it, insert the card into the accessory slot. The card may be installed in a minitower model or in a desktop model. Refer to "HP LAN Card Specifications" on page 14 for the position of the External Start connector on the HP LAN card. Refer to the PC's user or technical documentation for the position of the External Start connector on the system board. 5 Secure the card by replacing the slot cover screw or the retaining bracket and its screw, as appropriate for the PC. 6 Replace the cover. Reconnect the power cord and any connection to a telecommunications network. 8 English 16
-
 1
1 -
2
-
3
-
4
-
5
-
6
-
7
-
8
-
9
-
10
-
 11
11 -
 12
12 -
 13
13 -
 14
14 -
 15
15 -
 16
16 -
 17
17 -
 18
18 -
 19
19 -
 20
20 -
 21
21 -
22
-
23
-
24
-
25
-
26
-
27
-
28
-
29
-
30
-
31
-
32
-
33
-
34
-
35
-
36
-
37
-
38
-
39
-
40
-
41
-
42
-
43
-
44
-
45
-
46
-
47
-
48
-
49
-
50
-
51
-
52
-
53
-
54
-
55
-
56
-
57
-
58
-
59
-
60
-
61
-
62
-
63
-
64
-
65
-
66
-
67
-
68
-
69
-
70
-
71
-
72
-
73
-
74
-
75
-
76
-
77
-
78
-
79
-
80
-
81
-
82
-
83
-
84
-
85
-
86
-
87
-
88
-
89
-
90
-
91
-
92
-
93
-
94
-
95
-
96
-
97
-
98
-
99
-
100
-
101
-
102
-
103
-
104
-
105
-
106
-
107
-
108
-
109
-
110
-
111
-
112
-
113
-
114
-
115
-
116
-
117
-
118
-
119
-
120
-
121
 |
 |
