HP LE1901wi HP LE1901wi, L1910i, and LE1911i LCD Monitors User Guide - Page 19
Installing an HP Thin Client on the Stand, Removing the HP Logo Panel
 |
View all HP LE1901wi manuals
Add to My Manuals
Save this manual to your list of manuals |
Page 19 highlights
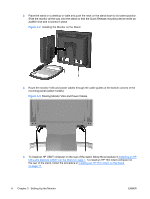
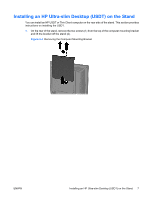
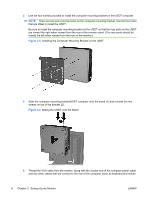
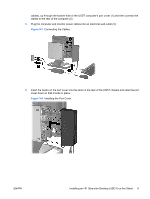
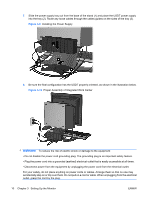
Installing an HP Thin Client on the Stand You can install an HP USDT or Thin Client computer on the rear side of the stand. This section provides instructions on installing the Thin Client. 1. On the rear of the stand, remove the two screws (1) from the top of the computer mounting bracket and lift the bracket off the stand (2). Figure 3-11 Removing the Computer Mounting Bracket 2. Remove the HP logo panel from the right side of the Thin Client to access the screw holes for the computer mounting bracket. Figure 3-12 Removing the HP Logo Panel ENWW Installing an HP Thin Client on the Stand 11
-
 1
1 -
2
-
3
-
4
-
5
-
6
-
7
-
8
-
9
-
10
-
11
-
12
-
13
-
 14
14 -
 15
15 -
 16
16 -
 17
17 -
 18
18 -
 19
19 -
 20
20 -
 21
21 -
 22
22 -
 23
23 -
 24
24 -
25
-
26
-
27
-
28
-
29
-
30
-
31
-
32
-
33
-
34
-
35
-
36
-
37
-
38
-
39
-
40
-
41
-
42
-
43
-
44
-
45
-
46
-
47
-
48
-
49
-
50
-
51
-
52
-
53
-
54
-
55
 |
 |

Installing an HP Thin Client on the Stand
You can install an HP USDT or Thin Client computer on the rear side of the stand. This section provides
instructions on installing the Thin Client.
1.
On the rear of the stand, remove the two screws (1) from the top of the computer mounting bracket
and lift the bracket off the stand (2).
Figure 3-11
Removing the Computer Mounting Bracket
2.
Remove the HP logo panel from the right side of the Thin Client to access the screw holes for the
computer mounting bracket.
Figure 3-12
Removing the HP Logo Panel
ENWW
Installing an HP Thin Client on the Stand
11