HP LE1901wi HP LE1901wi, L1910i, and LE1911i LCD Monitors User Guide - Page 20
Installing the Computer Mounting Bracket on the Thin Client, Sliding the Thin Client onto the Stand
 |
View all HP LE1901wi manuals
Add to My Manuals
Save this manual to your list of manuals |
Page 20 highlights
3. Use the four screws provided to install the computer mounting bracket on the Thin Client computer. NOTE: There are two sets of screw holes on the computer mounting bracket. Use the four holes that are centered on the bracket to install the Thin Client. Be sure to install the computer mounting bracket on the Thin Client so that the rear ports on the Thin Client are facing down and the feet on the Thin Client are facing outwards. Figure 3-13 Installing the Computer Mounting Bracket on the Thin Client 4. Slide the computer mounting bracket/Thin Client computer onto the stand (1) and reinstall the two screws on top of the bracket (2). Figure 3-14 Sliding the Thin Client onto the Stand 12 Chapter 3 Setting Up the Monitor ENWW
-
 1
1 -
2
-
3
-
4
-
5
-
6
-
7
-
8
-
9
-
10
-
11
-
12
-
13
-
14
-
 15
15 -
 16
16 -
 17
17 -
 18
18 -
 19
19 -
 20
20 -
 21
21 -
 22
22 -
 23
23 -
 24
24 -
 25
25 -
26
-
27
-
28
-
29
-
30
-
31
-
32
-
33
-
34
-
35
-
36
-
37
-
38
-
39
-
40
-
41
-
42
-
43
-
44
-
45
-
46
-
47
-
48
-
49
-
50
-
51
-
52
-
53
-
54
-
55
 |
 |

3.
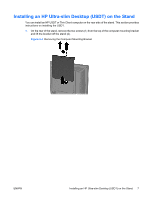
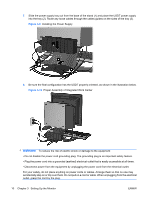
Use the four screws provided to install the computer mounting bracket on the Thin Client computer.
NOTE:
There are two sets of screw holes on the computer mounting bracket. Use the four holes
that are centered on the bracket to install the Thin Client.
Be sure to install the computer mounting bracket on the Thin Client so that the rear ports on the
Thin Client are facing down and the feet on the Thin Client are facing outwards.
Figure 3-13
Installing the Computer Mounting Bracket on the Thin Client
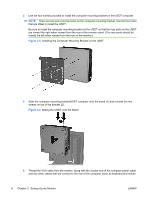
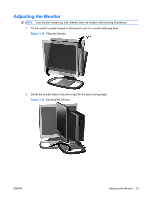
4.
Slide the computer mounting bracket/Thin Client computer onto the stand (1) and reinstall the two
screws on top of the bracket (2).
Figure 3-14
Sliding the Thin Client onto the Stand
12
Chapter 3
Setting Up the Monitor
ENWW