HP LE1901wi HP LE1901wi, L1910i, and LE1911i LCD Monitors User Guide - Page 21
Installing the Power Supply
 |
View all HP LE1901wi manuals
Add to My Manuals
Save this manual to your list of manuals |
Page 21 highlights
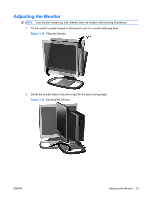
5. Connect the Thin Client power cable and peripheral device cables, such as keyboard and mouse cables, to the rear of the computer (1), then plug the computer and monitor power cables into an electrical wall outlet (2). Figure 3-15 Connecting the Cables 6. Slide the power supply tray out from the base of the stand (1) and place the Thin Client power supply into the tray (2). Route any loose cables through the cables guides on the sides of the tray (3). Figure 3-16 Installing the Power Supply ENWW Installing an HP Thin Client on the Stand 13
-
 1
1 -
2
-
3
-
4
-
5
-
6
-
7
-
8
-
9
-
10
-
11
-
12
-
13
-
14
-
15
-
 16
16 -
 17
17 -
 18
18 -
 19
19 -
 20
20 -
 21
21 -
 22
22 -
 23
23 -
 24
24 -
 25
25 -
 26
26 -
27
-
28
-
29
-
30
-
31
-
32
-
33
-
34
-
35
-
36
-
37
-
38
-
39
-
40
-
41
-
42
-
43
-
44
-
45
-
46
-
47
-
48
-
49
-
50
-
51
-
52
-
53
-
54
-
55
 |
 |

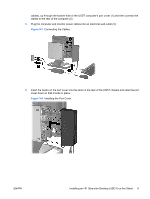
5.
Connect the Thin Client power cable and peripheral device cables, such as keyboard and mouse
cables, to the rear of the computer (1), then plug the computer and monitor power cables into an
electrical wall outlet (2).
Figure 3-15
Connecting the Cables
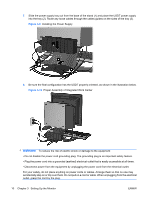
6.
Slide the power supply tray out from the base of the stand (1) and place the Thin Client power
supply into the tray (2). Route any loose cables through the cables guides on the sides of the tray
(3).
Figure 3-16
Installing the Power Supply
ENWW
Installing an HP Thin Client on the Stand
13