HP LaserJet M1005 HP LaserJet M1005 MFP - User Guide - Page 41
Creating and using watermarks, Resizing documents, Effects, Watermarks, First of normal size
 |
View all HP LaserJet M1005 manuals
Add to My Manuals
Save this manual to your list of manuals |
Page 41 highlights
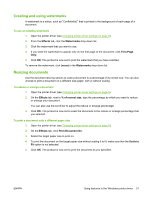
Creating and using watermarks A watermark is a notice, such as "Confidential," that is printed in the background of each page of a document. To use an existing watermark 1. Open the printer driver (see Changing printer-driver settings on page 9). 2. From the Effects tab, click the Watermarks drop-down list. 3. Click the watermark that you want to use. 4. If you want the watermark to appear only on the first page of the document, click First Page Only. 5. Click OK. The product is now set to print the watermark that you have selected. To remove the watermark, click (none) in the Watermarks drop-down list. Resizing documents Use the document resizing options to scale a document to a percentage of its normal size. You can also choose to print a document on a different size paper, with or without scaling. To reduce or enlarge a document 1. Open the printer driver (see Changing printer-driver settings on page 9). 2. On the Effects tab, next to % of normal size, type the percentage by which you want to reduce or enlarge your document. You can also use the scroll bar to adjust the reduce or enlarge percentage. 3. Click OK. The product is now set to scale the document to the reduce or enlarge percentage that you selected. To print a document onto a different paper size 1. Open the printer driver (see Changing printer-driver settings on page 9). 2. On the Effects tab, click Print Document On. 3. Select the target paper size to print on. 4. To print the document on the target paper size without scaling it to fit, make sure that the Scale to Fit option is not selected. 5. Click OK. The product is now set to print the document as you specified. ENWW Using features in the Windows printer driver 31
-
 1
1 -
2
-
3
-
4
-
5
-
6
-
7
-
8
-
9
-
10
-
11
-
12
-
13
-
14
-
15
-
16
-
17
-
18
-
19
-
20
-
21
-
22
-
23
-
24
-
25
-
26
-
27
-
28
-
29
-
30
-
31
-
32
-
33
-
34
-
35
-
 36
36 -
 37
37 -
 38
38 -
 39
39 -
 40
40 -
 41
41 -
 42
42 -
 43
43 -
 44
44 -
 45
45 -
 46
46 -
47
-
48
-
49
-
50
-
51
-
52
-
53
-
54
-
55
-
56
-
57
-
58
-
59
-
60
-
61
-
62
-
63
-
64
-
65
-
66
-
67
-
68
-
69
-
70
-
71
-
72
-
73
-
74
-
75
-
76
-
77
-
78
-
79
-
80
-
81
-
82
-
83
-
84
-
85
-
86
-
87
-
88
-
89
-
90
-
91
-
92
-
93
-
94
-
95
-
96
-
97
-
98
-
99
-
100
-
101
-
102
-
103
-
104
-
105
-
106
-
107
-
108
-
109
-
110
-
111
-
112
-
113
-
114
-
115
-
116
-
117
-
118
-
119
-
120
-
121
-
122
-
123
-
124
-
125
-
126
-
127
-
128
-
129
-
130
-
131
-
132
-
133
-
134
-
135
-
136
-
137
-
138
-
139
-
140
-
141
-
142
 |
 |