HP Latex 850 HP Scitex LX850 & LX820 Printer: Installation Guide - Page 56
Install the computer, monitor, LAN switch, tray, keyboard and mouse
 |
View all HP Latex 850 manuals
Add to My Manuals
Save this manual to your list of manuals |
Page 56 highlights
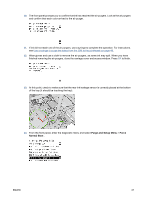
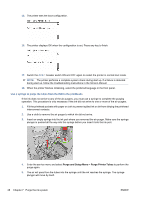
3. Lift up the right-hand side of the filter container; it pivots on the left. 4. Pull the old filter out of the bottom of its container and dispose of it according to the instructions provided with the new filter. 5. Unpack the new filters and ensure that the blue tabs at each end of each filter are at right angles to the filter. 6. Insert the new filter into the container. 7. Ensure that the blue tabs on the filters are correctly engaged with the hooks on the containers, otherwise the containers may not close completely. 8. Lower the container into position. 9. Lower the carriage cover and close the door. Press the OK key on the front panel. 10. When you finish the purging process and are ready to start the printer, select Check cleaner roll from the Ink System menu in normal printer mode. Install the computer, monitor, LAN switch, tray, keyboard and mouse Manpower 1 person Tools T20, T30 Phillips screwdriver Time 30 minutes 52 Chapter 8 Prepare the printer ENWW
-
 1
1 -
2
-
3
-
4
-
5
-
6
-
7
-
8
-
9
-
10
-
11
-
12
-
13
-
14
-
15
-
16
-
17
-
18
-
19
-
20
-
21
-
22
-
23
-
24
-
25
-
26
-
27
-
28
-
29
-
30
-
31
-
32
-
33
-
34
-
35
-
36
-
37
-
38
-
39
-
40
-
41
-
42
-
43
-
44
-
45
-
46
-
47
-
48
-
49
-
50
-
 51
51 -
 52
52 -
 53
53 -
 54
54 -
 55
55 -
 56
56 -
 57
57 -
 58
58 -
 59
59 -
 60
60 -
 61
61 -
62
-
63
-
64
-
65
-
66
-
67
-
68
-
69
-
70
-
71
-
72
-
73
-
74
-
75
-
76
-
77
-
78
-
79
-
80
-
81
-
82
-
83
-
84
-
85
 |
 |
