HP M5035 HP LaserJet M5025/M5035 MFP - (multiple language) Getting Started Gui - Page 6
ilustração 2 no dispositivo e, em seguida, feche a porta superior direita
 |
UPC - 882780574533
View all HP M5035 manuals
Add to My Manuals
Save this manual to your list of manuals |
Page 6 highlights
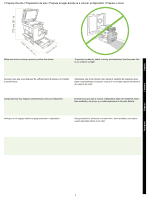
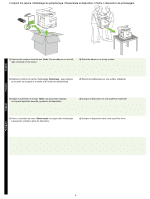
English Français 5) Open the upper-right door and remove the orange print-cartridge locks. 6) Remove the print cartridge from its packaging, remove the strip (callout 1) and orange tape, insert the print cartridge (callout 2) into the device, and then close the upper-right door (callout 3). 5) Ouvrez le panneau supérieur droit et retirez les verrous oranges de la cartouche d'impression. 6) Sortez la cartouche d'impression de son emballage, retirez la bande de protection (schéma 1) et la bande adhésive orange, insérez la cartouche d'impression dans le périphérique (schéma 2) puis fermez le panneau avant droit (schéma 3). 5) Abra la puerta superior derecha y quite los bloqueos naranjas del cartucho de impresión. 6) Retire el envoltorio del cartucho de impresión, quite la cinta naranja (ilustración 1), inserte el cartucho de impresión en el dispositivo (ilustración 2) y, a continuación, cierre la puerta delantera (ilustración 3). 5) Abra a porta superior direita e retire as travas cor de laranja dos cartuchos de impressão. 6) Retire o cartucho de impressão da embalagem, remova a fita longa (ilustração 1) e a fita laranja, insira o cartucho de impressão (ilustração 2) no dispositivo e, em seguida, feche a porta superior direita (ilustração 3). Español Português 5
-
 1
1 -
 2
2 -
 3
3 -
 4
4 -
 5
5 -
 6
6 -
 7
7 -
 8
8 -
 9
9 -
 10
10 -
 11
11 -
 12
12 -
13
-
14
-
15
-
16
-
17
-
18
-
19
-
20
-
21
-
22
-
23
-
24
-
25
-
26
-
27
-
28
-
29
-
30
-
31
-
32
-
33
-
34
-
35
-
36
 |
 |
