HP Mini 1103 HP Mini Getting Started - Windows 7, Windows XP, and Windows Vist - Page 14
Backing up and recovering, Backing up, Recovering - case
 |
View all HP Mini 1103 manuals
Add to My Manuals
Save this manual to your list of manuals |
Page 14 highlights
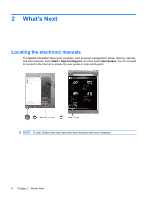
Backing up and recovering To protect your information, use Windows Backup and Restore to back up individual files and folders, back up your entire hard drive (select models only), create system repair discs (select models only), or create system restore points. In case of system failure, you can use the backup files to restore the contents of your computer. Windows Backup and Restore provides the following options: ● Creating a system repair disc (select models only) ● Backing up individual files and folders ● Creating a system image (select models only) ● Scheduling automatic backups (select models only) ● Creating system restore points ● Recovering individual files ● Restoring the computer to a previous state ● Recovering information using recovery tools NOTE: For instructions on these procedures, go to Help and Support. NOTE: Note: For additional information, go to the "Backup and Recovery" section of the online user guide. Backing up Recovery after a system failure is as complete as your most current backup. You should create system repair discs (select models only) and your initial backup immediately after software setup. As you add new software and data files, you should continue to back up your system on a regular basis to maintain a reasonably current backup. Use Backup and Restore to create a backup. Click Start, click All Programs, click Maintenance, and then click Backup and Restore. Follow the on-screen instructions to set up your backup, create a system image (select models only), or create a system repair disc (select models only). Recovering In case of system failure, use the f11 recovery tool to recover your original hard drive image. NOTE: The image includes the Windows® operating system and software programs installed at the factory. 8 Chapter 2 What's Next
-
 1
1 -
2
-
3
-
4
-
5
-
6
-
7
-
8
-
 9
9 -
 10
10 -
 11
11 -
 12
12 -
 13
13 -
 14
14 -
 15
15 -
 16
16 -
 17
17 -
 18
18 -
 19
19 -
20
-
21
-
22
 |
 |
