HP Officejet 4000 User Guide - Page 12
Print envelopes, Borderless printing, Print, Related topics, Printer Properties - specifications
 |
View all HP Officejet 4000 manuals
Add to My Manuals
Save this manual to your list of manuals |
Page 12 highlights
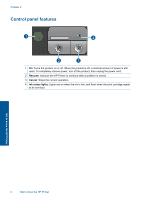
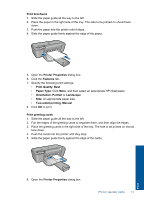
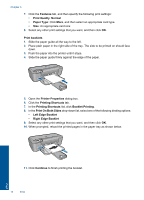
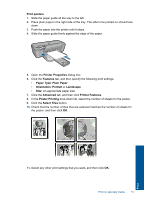
Chapter 3 9. Select the Borderless printing check box if it is not already checked. If the borderless paper size and paper type are not compatible, the product software displays an alert and allows you to select a different type or size. 10. Click OK, and then click Print or OK in the Print dialog box. NOTE: Do not leave unused photo paper in the paper tray. The paper might start to curl, which could reduce the quality of your printout. Photo paper should be flat before printing. Related topics • "Load media" on page 23 • "Print using the maximum dpi" on page 16 • "View the print resolution" on page 17 • "Create custom printing shortcuts" on page 18 • "Set the default print settings" on page 19 • "Stop the current job" on page 47 Print envelopes You can load one or more envelopes into the input tray of the HP Printer. Do not use shiny or embossed envelopes or envelopes that have clasps or windows. NOTE: For specific details on how to format text for printing on envelopes, consult the help files in your word processing software. For best results, consider using a label for the return address on envelopes. To print envelopes 1. Slide the paper guide all the way to the left. 2. Place the envelopes in the right side of the tray. The side to be printed on should face down. The flap should be on the left side. 3. Push the envelopes into the printer until they stop. 4. Slide the paper guide firmly against the edge of the envelopes. 5. Open the Printer Properties dialog box. 10 Print Print
-
 1
1 -
2
-
3
-
4
-
5
-
6
-
 7
7 -
 8
8 -
 9
9 -
 10
10 -
 11
11 -
 12
12 -
 13
13 -
 14
14 -
 15
15 -
 16
16 -
 17
17 -
18
-
19
-
20
-
21
-
22
-
23
-
24
-
25
-
26
-
27
-
28
-
29
-
30
-
31
-
32
-
33
-
34
-
35
-
36
-
37
-
38
-
39
-
40
-
41
-
42
-
43
-
44
-
45
-
46
-
47
-
48
-
49
-
50
-
51
-
52
-
53
-
54
-
55
-
56
-
57
-
58
-
59
-
60
 |
 |