HP OmniBook xe2-dc HP OmniBook XE2 - Tips, Troubleshooting and Specifications - Page 9
Hpsuppt.txt.
 |
View all HP OmniBook xe2-dc manuals
Add to My Manuals
Save this manual to your list of manuals |
Page 9 highlights
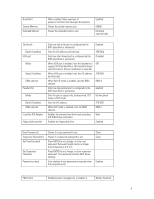
5. Wait until the test has finished. 6. If you intend to exit without running advanced tests, press F4 twice to save system and test information in the Support Ticket log file, HPSUPPT.TXT. Then remove the diagnostic disk (if you used one) and press F3 twice to exit. 7. Optional: Run the advanced tests. Press F2 twice to open the advanced test screen. 8. Select and run the appropriate tests. Tests are not listed if no such hardware is detected. Press the following keys to run tests: ENTER F5 or SPACE F6 F7 F10 Runs the highlighted test. Marks or unmarks the highlighted test. Marks or unmarks all tests in the current menu. Marks or unmarks all tests in all menus. Runs all marked tests. 9. When you have finished running tests, press ESC to exit the advanced tests. 10. Optional: Save system and test information. Press F4 to create the Support Ticket log file, HPSUPPT.TXT. NOTE: If you ran the diagnostics from a floppy disk, the log file is stored on the diskette. If you ran the diagnostics from the hard disk (by pressing F10), the log file is stored on a hidden partition on the hard disk. 11. To exit, remove the diagnostic disk (if you used one), and press F3 twice to exit and reboot. 12. Optional: Check the Support Ticket log. The Support Ticket log file contains a list of all test results and errors. If you ran the diagnostics from a floppy disk, you can open the HPSUPPT.TXT file with a text editor, such as Notepad. To open a log file that was stored on your hard disk, go to the C:\DMI\DiagTools directory and double-click HPSUPPT.EXE; this displays the log file in Notepad. 9
-
 1
1 -
2
-
3
-
 4
4 -
 5
5 -
 6
6 -
 7
7 -
 8
8 -
 9
9 -
 10
10 -
 11
11 -
 12
12 -
 13
13 -
 14
14 -
15
-
16
-
17
-
18
-
19
-
20
-
21
-
22
-
23
-
24
-
25
-
26
-
27
-
28
-
29
-
30
-
31
-
32
-
33
-
34
-
35
-
36
-
37
-
38
-
39
-
40
-
41
-
42
-
43
-
44
-
45
-
46
-
47
-
48
 |
 |