HP OmniBook xt6200 HP Omnibook xt6200 & vt6200 Notebook PCs - Startup Guid - Page 42
Replacing the Hard Disk Drive
 |
View all HP OmniBook xt6200 manuals
Add to My Manuals
Save this manual to your list of manuals |
Page 42 highlights
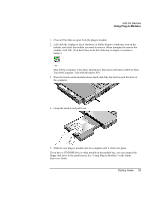
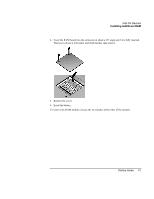
Add-On Devices Replacing the Hard Disk Drive Replacing the Hard Disk Drive To replace the hard disk drive You'll need a small Phillips screwdriver for this procedure. 1. Unplug the AC adapter if you're using one, and remove the battery. 2. Turn the unit bottom side up and remove the two hard drive screws. 3. Raise the cover on the end of the drive so that its retainer tab is free of the computer casing, then gently pull the hard drive out of the computer. Important 4. Gently slide the new drive into the hard drive compartment. Press firmly to make sure the connector seats properly. 5. Slide the cover down into place (so the retainer tab engages the casing), and reinstall the hard drive screws. If you are installing a new hard disk drive, you should create a Utility partition on the drive before loading any software. See "To recover the factory installation of your hard disk" on page 51. To install the holder on a new hard disk drive or prepare a new hard disk for use, see "Replacing the Hard Disk Drive" in the online Reference Guide. 42 Startup Guide
-
 1
1 -
2
-
3
-
4
-
5
-
6
-
7
-
8
-
9
-
10
-
11
-
12
-
13
-
14
-
15
-
16
-
17
-
18
-
19
-
20
-
21
-
22
-
23
-
24
-
25
-
26
-
27
-
28
-
29
-
30
-
31
-
32
-
33
-
34
-
35
-
36
-
 37
37 -
 38
38 -
 39
39 -
 40
40 -
 41
41 -
 42
42 -
 43
43 -
 44
44 -
 45
45 -
 46
46 -
 47
47 -
48
-
49
-
50
-
51
-
52
-
53
-
54
-
55
-
56
-
57
-
58
-
59
-
60
-
61
-
62
-
63
-
64
-
65
-
66
-
67
-
68
-
69
-
70
-
71
-
72
-
73
-
74
-
75
-
76
-
77
 |
 |
