HP PSC 500 HP PSC 500 - (English) Setup Guide - Page 24
Setting Up the Server - network
 |
View all HP PSC 500 manuals
Add to My Manuals
Save this manual to your list of manuals |
Page 24 highlights
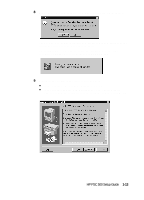
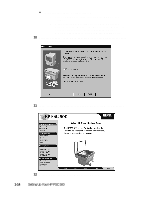
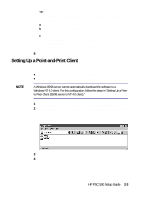
Minimum System Requirements Each computer must meet the minimum system requirements for connection to a LAN. A computer that meets these requirements is one that: X Contains a properly configured network card. X Is a client or server for Microsoft networks. X Has basic network services and protocols. X Has the proper network adapter. X Has LAN access. Setting Up the Server This section provides instructions for setting up the server. IMPORTANT If you are using Windows NT 4.0, you must have administrative rights for your computer to set up an NT 4.0 server for network printing. For more information, see Windows NT 4.0 Help or your system administrator. 1 Install the HP PSC 500 software on the server, as described in Chapter 1 under "Installing the HP PSC 500 software." 2 If you are using Windows 95/98 as your server, perform the following steps before continuing. a On the Windows desktop, right-click Network Neighborhood, and choose Properties. b On the Configuration tab, click File and Print Sharing. c Select the check box for the sharing options you want. d Click OK to store your changes, and then click OK again to exit the File and Print Sharing dialog box. 3 Restart the computer. 4 If an electronic registration window appears, follow the on-screen instructions to register your HP PSC. 5 On the Windows taskbar, click Start, point to Settings, and choose Printers. 6 Right-click the HP PSC 500 icon, and choose Sharing. The HP PSC 500 properties dialog box appears, with the Sharing tab visible. 7 Click the Shared (Windows NT 4.0) or Shared As (Windows 95/98) option. 8 In the Share Name field, type a name for the HP PSC if you do not want to use the default name, HPPSC. TIP Note the share name of the HP PSC. You will need it to set up client computers. 2-2 Sharing HP PSC 500 on a Network
-
 1
1 -
2
-
3
-
4
-
5
-
6
-
7
-
8
-
9
-
10
-
11
-
12
-
13
-
14
-
15
-
16
-
17
-
18
-
 19
19 -
 20
20 -
 21
21 -
 22
22 -
 23
23 -
 24
24 -
 25
25 -
 26
26 -
 27
27 -
 28
28 -
 29
29 -
30
-
31
-
32
 |
 |