HP PSC 500 HP PSC 500 - (English) Setup Guide - Page 25
Setting Up a Point-and-Print Client - driver
 |
View all HP PSC 500 manuals
Add to My Manuals
Save this manual to your list of manuals |
Page 25 highlights
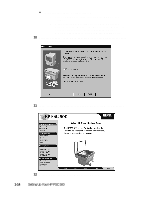
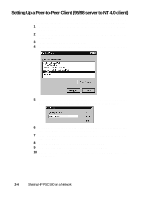
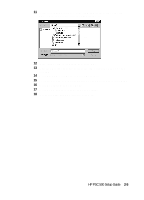
TIP If you are setting up a Windows NT 4.0 server that supports Windows 95/98 clients, complete the following steps before continuing. a Click Alternate drivers, and then click Windows 95. b After the message instructing you to insert the floppy disk appears, click OK and insert the HP PSC Series CD-ROM. c In the Printer Drivers for Windows 95 dialog box, click Browse, open the AddPrinter folder, open the w9x folder, and double-click the hpo9508.inf file. This allows the Windows NT 4.0 server to download the correct driver to a Windows 95/98 client. 9 Click OK to close the dialog box and store your changes. Setting Up a Point-and-Print Client Follow these steps to install the printing software on each client for either of the following configurations: X Windows 95/98 server with only Windows 95/98 clients. X Windows NT 4.0 server with Windows 95/98 and/or NT 4.0 clients. NOTE A Windows 95/98 server cannot automatically download the software to a Windows NT 4.0 client. For this configuration, follow the steps in "Setting Up a Peerto-Peer Client (95/98 server to NT 4.0 client)." 1 On the Windows desktop, double-click Network Neighborhood. 2 Find the name of the server that the HP PSC is directly connected to, and double-click its icon. The server window appears showing shared devices, including the share name of the HP PSC. 3 Double-click the HP PSC's share name. 4 After the setup message "Before you can use the printer..." appears, click Yes and then wait several moments while the client computer establishes a connection to the HP PSC. After connecting to the shared HP PSC, the HP PSC 500 window appears. HP PSC 500 Setup Guide 2-3
-
 1
1 -
2
-
3
-
4
-
5
-
6
-
7
-
8
-
9
-
10
-
11
-
12
-
13
-
14
-
15
-
16
-
17
-
18
-
19
-
 20
20 -
 21
21 -
 22
22 -
 23
23 -
 24
24 -
 25
25 -
 26
26 -
 27
27 -
 28
28 -
 29
29 -
 30
30 -
31
-
32
 |
 |