HP Pavilion g6-2300 HP Pavilion g6 Notebook PC Maintenance and Service Guide - Page 54
Memory module, WARNING, CAUTION
 |
View all HP Pavilion g6-2300 manuals
Add to My Manuals
Save this manual to your list of manuals |
Page 54 highlights
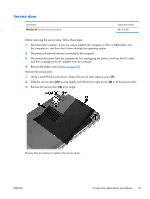
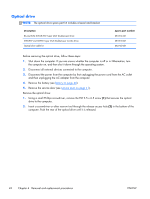
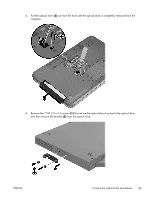
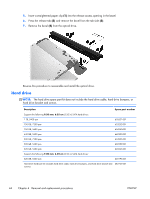
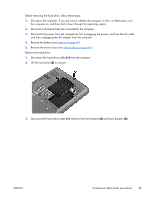
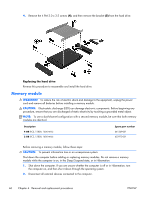
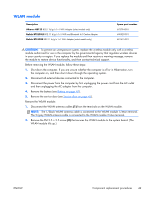
4. Remove the 4 PM 3.0 x 3.5 screws (4), and then remove the bracket (5) from the hard drive. Replacing the hard drive Reverse this procedure to reassemble and install the hard drive. Memory module WARNING! To reduce the risk of electric shock and damage to the equipment, unplug the power cord and remove all batteries before installing a memory module. CAUTION: Electrostatic discharge (ESD) can damage electronic components. Before beginning any procedure, ensure that you are discharged of static electricity by touching a grounded metal object. NOTE: To use a dual-channel configuration with a second memory module, be sure that both memory modules are identical. Description 4 GB (PC3, 12800, 1600 MHz) 2 GB (PC3, 12800, 1600 MHz) Spare part number 641369-001 652972-001 Before removing a memory module, follow these steps: CAUTION: To prevent information loss or an unresponsive system: Shut down the computer before adding or replacing memory modules. Do not remove a memory module while the computer is on, in the Sleep/Suspend state, or in Hibernation. 1. Shut down the computer. If you are unsure whether the computer is off or in Hibernation, turn the computer on, and then shut it down through the operating system. 2. Disconnect all external devices connected to the computer. 46 Chapter 4 Removal and replacement procedures ENWW
-
 1
1 -
2
-
3
-
4
-
5
-
6
-
7
-
8
-
9
-
10
-
11
-
12
-
13
-
14
-
15
-
16
-
17
-
18
-
19
-
20
-
21
-
22
-
23
-
24
-
25
-
26
-
27
-
28
-
29
-
30
-
31
-
32
-
33
-
34
-
35
-
36
-
37
-
38
-
39
-
40
-
41
-
42
-
43
-
44
-
45
-
46
-
47
-
48
-
 49
49 -
 50
50 -
 51
51 -
 52
52 -
 53
53 -
 54
54 -
 55
55 -
 56
56 -
 57
57 -
 58
58 -
 59
59 -
60
-
61
-
62
-
63
-
64
-
65
-
66
-
67
-
68
-
69
-
70
-
71
-
72
-
73
-
74
-
75
-
76
-
77
-
78
-
79
-
80
-
81
-
82
-
83
-
84
-
85
-
86
-
87
-
88
-
89
-
90
-
91
-
92
-
93
-
94
-
95
-
96
-
97
-
98
-
99
-
100
-
101
-
102
-
103
-
104
-
105
-
106
-
107
-
108
-
109
-
110
-
111
-
112
-
113
-
114
-
115
-
116
-
117
-
118
-
119
-
120
-
121
-
122
-
123
-
124
 |
 |
