HP Pavilion n3402 HP Pavilion Notebook N3400 Series - Reference Guide - Page 76
Configuring the Pavilion Notebook with the BIOS Setup Utility
 |
View all HP Pavilion n3402 manuals
Add to My Manuals
Save this manual to your list of manuals |
Page 76 highlights
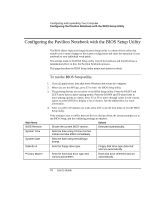
Configuring and Expanding Your Computer Configuring the Pavilion Notebook with the BIOS Setup Utility Configuring the Pavilion Notebook with the BIOS Setup Utility The BIOS (Basic Input and Output System) Setup utility is a menu-driven utility that enables you to make changes to the system configuration and tailor the operation of your notebook to your individual work needs. The settings made in the BIOS Setup utility control the hardware and therefore have a fundamental effect on how the Pavilion Notebook operates. This page describes the BIOS Setup utility menus and options in detail. To run the BIOS Setup utility Main Menu BIOS Revision System Time System Date Diskette A Primary Master 1. Close all applications, then shut down Windows and restart the computer. 2. When you see the HP logo, press F2 to enter the BIOS Setup utility. 3. The pointing devices are not active in the BIOS Setup utility. Press the RIGHT and LEFT arrow keys to move among menus. Press the DOWN and UP arrow keys to move among options in a menu. Press F5 or F6 to move through values for the current option or press ENTER to display a list of choices. See the tables below for more information. 4. After you select the options you want, press F10 or use the Exit menu to exit the BIOS Setup utility. If the settings cause a conflict between devices during reboot, the system prompts you to run BIOS Setup, and the conflicting settings are marked. Default Shows the current BIOS version. Detected automatically. Sets the time using 24-hour format. Values set take effect immediately. Sets the date using mm/dd/yyyy format. Sets the floppy drive type. Floppy disk drive type detected and set automatically. Sets the hard disk drive type and various parameters. Hard disk drive detected and set automatically. 76 User's Guide
-
 1
1 -
2
-
3
-
4
-
5
-
6
-
7
-
8
-
9
-
10
-
11
-
12
-
13
-
14
-
15
-
16
-
17
-
18
-
19
-
20
-
21
-
22
-
23
-
24
-
25
-
26
-
27
-
28
-
29
-
30
-
31
-
32
-
33
-
34
-
35
-
36
-
37
-
38
-
39
-
40
-
41
-
42
-
43
-
44
-
45
-
46
-
47
-
48
-
49
-
50
-
51
-
52
-
53
-
54
-
55
-
56
-
57
-
58
-
59
-
60
-
61
-
62
-
63
-
64
-
65
-
66
-
67
-
68
-
69
-
70
-
 71
71 -
 72
72 -
 73
73 -
 74
74 -
 75
75 -
 76
76 -
 77
77 -
 78
78 -
 79
79 -
 80
80 -
 81
81 -
82
-
83
-
84
-
85
-
86
-
87
-
88
-
89
-
90
-
91
-
92
-
93
-
94
-
95
-
96
-
97
-
98
-
99
-
100
-
101
-
102
-
103
-
104
-
105
-
106
-
107
-
108
-
109
-
110
-
111
-
112
-
113
-
114
-
115
-
116
-
117
-
118
-
119
-
120
-
121
-
122
-
123
-
124
-
125
-
126
-
127
-
128
-
129
-
130
 |
 |
