HP Pavilion zt1200 HP Pavilion ze1200 and xf300 Series Notebook PCs - Troubles - Page 5
s, Tables
 |
View all HP Pavilion zt1200 manuals
Add to My Manuals
Save this manual to your list of manuals |
Page 5 highlights
Figures Figure 1. Front View ...7 Figure 2. Back View ...8 Figure 3. Bottom View...8 Figure 4. Main Status Lights ...9 Figure 5. Keyboard Status Lights...9 Figure 11. Pressing the System-Off Switch 11 Figure 12. Removing the Battery ...36 Figure 13. Removing the Hard Disk Drive 37 Figure 14. Removing the Hard Disk Tray 38 Figure 15. Removing an SDRAM Module 40 Figure 16. Installing an SDRAM Module 40 Tables Table 1. Battery Replacement Part Numbers 36 Table 2. Hard Disk Drive Replacement Part Numbers 37 Table 3. SDRAM Module Replacement Part Numbers 39 Table 7. Replacing Small Parts ...41 Table 8. Accessories...41 ze1000 Series Troubleshooting and Self-Repair Guide v
-
 1
1 -
 2
2 -
 3
3 -
 4
4 -
 5
5 -
 6
6 -
 7
7 -
 8
8 -
 9
9 -
 10
10 -
 11
11 -
12
-
13
-
14
-
15
-
16
-
17
-
18
-
19
-
20
-
21
-
22
-
23
-
24
-
25
-
26
-
27
-
28
-
29
-
30
-
31
-
32
-
33
-
34
-
35
-
36
-
37
-
38
-
39
-
40
-
41
-
42
 |
 |

ze1000 Series Troubleshooting and Self-Repair Guide
v
Figures
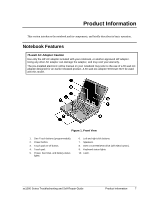
Figure 1. Front View
...............................................................................................................................
7
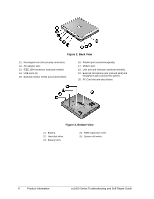
Figure 2. Back View
...............................................................................................................................
8
Figure 3. Bottom View
............................................................................................................................
8
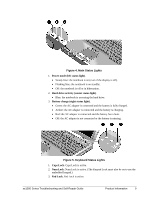
Figure 4. Main Status Lights
...................................................................................................................
9
Figure 5. Keyboard Status Lights
............................................................................................................
9
Figure 11. Pressing the System-Off Switch
..........................................................................................
11
Figure 12. Removing the Battery
..........................................................................................................
36
Figure 13. Removing the Hard Disk Drive
...........................................................................................
37
Figure 14. Removing the Hard Disk Tray
.............................................................................................
38
Figure 15. Removing an SDRAM Module
...........................................................................................
40
Figure 16. Installing an SDRAM Module
.............................................................................................
40
Tables
Table 1. Battery Replacement Part Numbers
........................................................................................
36
Table 2. Hard Disk Drive Replacement Part Numbers
.........................................................................
37
Table 3. SDRAM Module Replacement Part Numbers
........................................................................
39
Table 7. Replacing Small Parts
.............................................................................................................
41
Table 8. Accessories
..............................................................................................................................
41