HP Photosmart 2600 User Guide - Page 15
Use the HP Image Zone to do more with your HP all-in-one, Access the HP Image Zone software (Windows) - setup guide
 |
View all HP Photosmart 2600 manuals
Add to My Manuals
Save this manual to your list of manuals |
Page 15 highlights
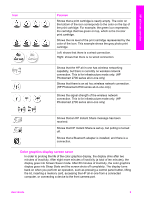
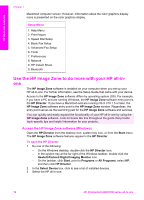
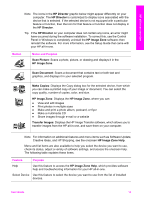
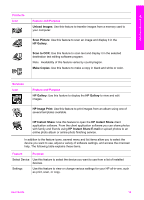
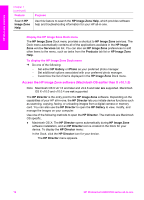
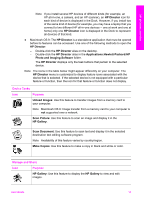
HP all-in-one overview Chapter 1 Macintosh computer screen. However, information about the color graphics display icons is presented on the color graphics display. Setup Menu 1. Help Menu 2. Print Report 3. Speed Dial Setup 4. Basic Fax Setup 5. Advanced Fax Setup 6. Tools 7. Preferences 8. Network 9. HP Instant Share 0. Bluetooth Use the HP Image Zone to do more with your HP all-inone The HP Image Zone software is installed on your computer when you set up your HP all-in-one. For further information, see the Setup Guide that came with your device. Access to the HP Image Zone software differs by operating system (OS). For example, if you have a PC and are running Windows, the HP Image Zone software entry point is the HP Director. If you have a Macintosh and are running OS X V10.1.5 or later, the HP Image Zone software entry point is the HP Image Zone window. Regardless, the entry point serves as the launching pad for the HP Image Zone software and services. You can quickly and easily expand the functionality of your HP all-in-one by using the HP Image Zone software. Look for boxes like this throughout the guide that provide topic-specific tips and helpful information for your projects. Access the HP Image Zone software (Windows) Open the HP Director from the desktop icon, system tray icon, or from the Start menu. The HP Image Zone software features appear in the HP Director. To open the HP Director 1 Do one of the following: - On the Windows desktop, double-click the HP Director icon. - In the system tray at the far right of the Windows taskbar, double-click the Hewlett-Packard Digital Imaging Monitor icon. - On the taskbar, click Start, point to Programs or All Programs, select HP, and then click HP Director. 2 In the Select Device box, click to see a list of installed devices. 3 Select the HP all-in-one. 12 HP Photosmart 2600/2700 series all-in-one
-
 1
1 -
2
-
3
-
4
-
5
-
6
-
7
-
8
-
9
-
 10
10 -
 11
11 -
 12
12 -
 13
13 -
 14
14 -
 15
15 -
 16
16 -
 17
17 -
 18
18 -
 19
19 -
 20
20 -
21
-
22
-
23
-
24
-
25
-
26
-
27
-
28
-
29
-
30
-
31
-
32
-
33
-
34
-
35
-
36
-
37
-
38
-
39
-
40
-
41
-
42
-
43
-
44
-
45
-
46
-
47
-
48
-
49
-
50
-
51
-
52
-
53
-
54
-
55
-
56
-
57
-
58
-
59
-
60
-
61
-
62
-
63
-
64
-
65
-
66
-
67
-
68
-
69
-
70
-
71
-
72
-
73
-
74
-
75
-
76
-
77
-
78
-
79
-
80
-
81
-
82
-
83
-
84
-
85
-
86
-
87
-
88
-
89
-
90
-
91
-
92
-
93
-
94
-
95
-
96
-
97
-
98
-
99
-
100
-
101
-
102
-
103
-
104
-
105
-
106
-
107
-
108
-
109
-
110
-
111
-
112
-
113
-
114
-
115
-
116
-
117
-
118
-
119
-
120
-
121
-
122
-
123
-
124
-
125
-
126
-
127
-
128
-
129
-
130
-
131
-
132
-
133
-
134
-
135
-
136
-
137
-
138
-
139
-
140
-
141
-
142
-
143
-
144
-
145
-
146
-
147
-
148
-
149
-
150
-
151
-
152
-
153
-
154
-
155
-
156
-
157
-
158
-
159
-
160
-
161
-
162
-
163
-
164
-
165
-
166
-
167
-
168
-
169
-
170
-
171
-
172
-
173
-
174
-
175
-
176
-
177
-
178
-
179
-
180
-
181
-
182
-
183
-
184
-
185
-
186
-
187
-
188
-
189
-
190
-
191
-
192
-
193
-
194
-
195
-
196
-
197
-
198
-
199
-
200
-
201
-
202
-
203
-
204
-
205
-
206
-
207
-
208
-
209
-
210
-
211
-
212
-
213
-
214
-
215
-
216
-
217
-
218
-
219
-
220
-
221
-
222
-
223
-
224
-
225
-
226
-
227
-
228
-
229
-
230
-
231
-
232
-
233
-
234
-
235
-
236
-
237
-
238
-
239
-
240
-
241
 |
 |