HP Photosmart 315 HP Photosmart 315 digital camera - (English) User Guide - Page 60
Windows Explorer and My Computer windows. - download
 |
View all HP Photosmart 315 manuals
Add to My Manuals
Save this manual to your list of manuals |
Page 60 highlights
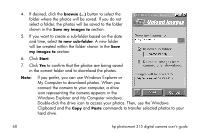
4. If desired, click the browse (...) button to select the folder where the photos will be saved. If you do not select a folder, the photos will be saved to the folder shown in the Save my images to section. 5. If you want to create a sub-folder based on the date and time, select In new sub-folder. A new folder will be created within the folder shown in the Save my images to section. 6. Click Start. 7. Click Yes to confirm that the photos are being saved in the correct folder and to download the photos. Note: If you prefer, you can use Windows Explorer or My Computer to download photos. When you connect the camera to your computer, a drive icon representing the camera appears in the Windows Explorer and My Computer windows. Double-click the drive icon to access your photos. Then, use the Windows Clipboard and the Copy and Paste commands to transfer selected photos to your hard drive. 60 hp photosmart 315 digital camera user's guide
-
 1
1 -
2
-
3
-
4
-
5
-
6
-
7
-
8
-
9
-
10
-
11
-
12
-
13
-
14
-
15
-
16
-
17
-
18
-
19
-
20
-
21
-
22
-
23
-
24
-
25
-
26
-
27
-
28
-
29
-
30
-
31
-
32
-
33
-
34
-
35
-
36
-
37
-
38
-
39
-
40
-
41
-
42
-
43
-
44
-
45
-
46
-
47
-
48
-
49
-
50
-
51
-
52
-
53
-
54
-
 55
55 -
 56
56 -
 57
57 -
 58
58 -
 59
59 -
 60
60 -
 61
61 -
 62
62 -
 63
63 -
 64
64 -
 65
65 -
66
-
67
-
68
-
69
-
70
-
71
-
72
-
73
-
74
-
75
-
76
-
77
-
78
-
79
-
80
-
81
-
82
-
83
-
84
-
85
-
86
-
87
-
88
-
89
-
90
-
91
-
92
-
93
-
94
-
95
-
96
-
97
-
98
-
99
-
100
-
101
-
102
-
103
-
104
-
105
-
106
-
107
-
108
-
109
-
110
-
111
-
112
 |
 |
