HP Photosmart C5200 Basics Guide - Page 14
Replace the print cartridges, Shop for HP Supplies - ink cartridges
 |
View all HP Photosmart C5200 manuals
Add to My Manuals
Save this manual to your list of manuals |
Page 14 highlights
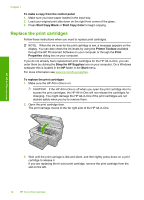
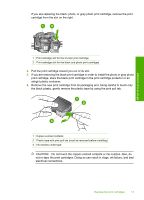
Chapter 1 To make a copy from the control panel 1. Make sure you have paper loaded in the input tray. 2. Load your original print side down on the right front corner of the glass. 3. Press Start Copy Black or Start Copy Color to begin copying. Replace the print cartridges Follow these instructions when you need to replace print cartridges. NOTE: When the ink level for the print cartridge is low, a message appears on the display. You can also check the ink levels by using the Printer Toolbox available through the HP Photosmart Software on your computer or through the Print Properties dialog box on your computer. If you do not already have replacement print cartridges for the HP All-in-One, you can order them by clicking the Shop for HP Supplies icon on your computer. On a Windows computer this is located in the HP folder in the Start menu. For more information see www.hp.com/buy/supplies. To replace the print cartridges 1. Make sure the HP All-in-One is on. CAUTION: If the HP All-in-One is off when you open the print cartridge door to access the print cartridges, the HP All-in-One will not release the cartridges for changing. You might damage the HP All-in-One if the print cartridges are not docked safely when you try to remove them. 2. Open the print cartridge door. The print carriage moves to the far right side of the HP All-in-One. HP All-in-One overview 3. Wait until the print carriage is idle and silent, and then lightly press down on a print cartridge to release it. If you are replacing the tri-color print cartridge, remove the print cartridge from the slot on the left. 12 HP All-in-One overview
-
 1
1 -
2
-
3
-
4
-
5
-
6
-
7
-
8
-
 9
9 -
 10
10 -
 11
11 -
 12
12 -
 13
13 -
 14
14 -
 15
15 -
 16
16 -
 17
17 -
 18
18 -
 19
19 -
20
-
21
-
22
-
23
-
24
-
25
-
26
-
27
-
28
-
29
-
30
-
31
 |
 |
