HP Photosmart D5400 User Guide - Page 179
Print head appears to be missing or damaged, Solution, Cause, To reinstall the print head
 |
View all HP Photosmart D5400 manuals
Add to My Manuals
Save this manual to your list of manuals |
Page 179 highlights
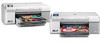
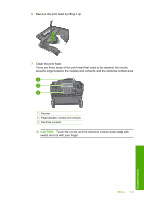
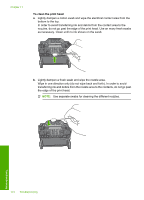
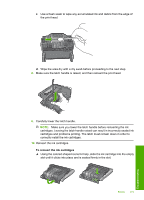
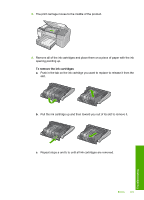
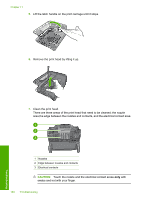
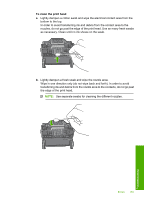
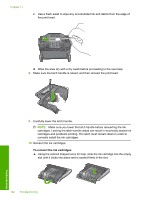
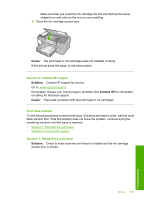
Chapter 11 Previously used genuine HP cartridge Solution: Check the print quality of the current print job. If it is not satisfactory, try cleaning the print head to see if that improves the quality. Follow the prompts on the display or computer screen to continue. For more information, see: "Clean the print head" on page 64 NOTE: HP recommends that you do not leave the ink cartridge outside of the printer for an extended period of time. If a used cartridge is installed, check the print quality. If it is not satisfactory, run the cleaning procedure from the toolbox. Cause: The genuine HP ink cartridge was previously used in some other product. Print head appears to be missing or damaged Try the following solutions to resolve the issue. Solutions are listed in order, with the most likely solution first. If the first solution does not solve the problem, continue trying the remaining solutions until the issue is resolved. • Solution 1: Reinstall the print head and cartridges • Solution 2: Contact HP support Solution 1: Reinstall the print head and cartridges Solution: If you just installed the print head and ink cartridges, remove and reinsert them using the following procedure. NOTE: If you are setting up the product for the first time, make sure you follow the instructions in the Setup Guide for installing the print head and the ink cartridges. To reinstall the print head 1. Make sure that the product is turned on. 2. Open the ink cartridge access door by lifting from the front right of the product, until the door locks into place. 178 Troubleshooting Troubleshooting
-
 1
1 -
2
-
3
-
4
-
5
-
6
-
7
-
8
-
9
-
10
-
11
-
12
-
13
-
14
-
15
-
16
-
17
-
18
-
19
-
20
-
21
-
22
-
23
-
24
-
25
-
26
-
27
-
28
-
29
-
30
-
31
-
32
-
33
-
34
-
35
-
36
-
37
-
38
-
39
-
40
-
41
-
42
-
43
-
44
-
45
-
46
-
47
-
48
-
49
-
50
-
51
-
52
-
53
-
54
-
55
-
56
-
57
-
58
-
59
-
60
-
61
-
62
-
63
-
64
-
65
-
66
-
67
-
68
-
69
-
70
-
71
-
72
-
73
-
74
-
75
-
76
-
77
-
78
-
79
-
80
-
81
-
82
-
83
-
84
-
85
-
86
-
87
-
88
-
89
-
90
-
91
-
92
-
93
-
94
-
95
-
96
-
97
-
98
-
99
-
100
-
101
-
102
-
103
-
104
-
105
-
106
-
107
-
108
-
109
-
110
-
111
-
112
-
113
-
114
-
115
-
116
-
117
-
118
-
119
-
120
-
121
-
122
-
123
-
124
-
125
-
126
-
127
-
128
-
129
-
130
-
131
-
132
-
133
-
134
-
135
-
136
-
137
-
138
-
139
-
140
-
141
-
142
-
143
-
144
-
145
-
146
-
147
-
148
-
149
-
150
-
151
-
152
-
153
-
154
-
155
-
156
-
157
-
158
-
159
-
160
-
161
-
162
-
163
-
164
-
165
-
166
-
167
-
168
-
169
-
170
-
171
-
172
-
173
-
 174
174 -
 175
175 -
 176
176 -
 177
177 -
 178
178 -
 179
179 -
 180
180 -
 181
181 -
 182
182 -
 183
183 -
 184
184 -
185
-
186
-
187
-
188
-
189
-
190
-
191
-
192
-
193
-
194
-
195
-
196
-
197
-
198
-
199
-
200
-
201
-
202
-
203
-
204
-
205
-
206
-
207
-
208
-
209
-
210
-
211
-
212
-
213
-
214
-
215
-
216
-
217
-
218
-
219
-
220
-
221
 |
 |