HP Presario CQ57-200 Compaq Presario CQ57 Notebook PC - Maintenance and Servic - Page 51
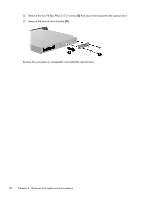
Remove the four Phillips PM 2.5×6.0 screws, built into the base enclosure.
 |
View all HP Presario CQ57-200 manuals
Add to My Manuals
Save this manual to your list of manuals |
Page 51 highlights
2. Lift the rear edge of the hard drive compartment cover (2) up and forward until it rests at an angle. 3. Remove the hard drive compartment cover. The hard drive compartment cover is available in the Plastics Kit, spare part number 646131-001. 4. Disconnect the hard drive connector cable (1) from the system board. 5. Release the hard drive connector cable from the clips (2) built into the base enclosure. 6. Remove the four Phillips PM 2.5×6.0 screws (3) that secure the hard drive to the computer. 7. Remove the hard drive (4). Component replacement procedures 43
-
 1
1 -
2
-
3
-
4
-
5
-
6
-
7
-
8
-
9
-
10
-
11
-
12
-
13
-
14
-
15
-
16
-
17
-
18
-
19
-
20
-
21
-
22
-
23
-
24
-
25
-
26
-
27
-
28
-
29
-
30
-
31
-
32
-
33
-
34
-
35
-
36
-
37
-
38
-
39
-
40
-
41
-
42
-
43
-
44
-
45
-
 46
46 -
 47
47 -
 48
48 -
 49
49 -
 50
50 -
 51
51 -
 52
52 -
 53
53 -
 54
54 -
 55
55 -
 56
56 -
57
-
58
-
59
-
60
-
61
-
62
-
63
-
64
-
65
-
66
-
67
-
68
-
69
-
70
-
71
-
72
-
73
-
74
-
75
-
76
-
77
-
78
-
79
-
80
-
81
-
82
-
83
-
84
-
85
-
86
-
87
-
88
-
89
-
90
-
91
-
92
-
93
-
94
-
95
-
96
-
97
-
98
-
99
-
100
-
101
-
102
-
103
-
104
-
105
-
106
-
107
-
108
-
109
-
110
-
111
-
112
 |
 |

2.
Lift the rear edge of the hard drive compartment cover
(2)
up and forward until it rests at
an angle.
3.
Remove the hard drive compartment cover. The hard drive compartment cover is available in the
Plastics Kit, spare part number 646131-001.
4.
Disconnect the hard drive connector cable
(1)
from the system board.
5.
Release the hard drive connector cable from the clips
(2)
built into the base enclosure.
6.
Remove the four Phillips PM 2.5×6.0 screws
(3)
that secure the hard drive to the computer.
7.
Remove the hard drive
(4)
.
Component replacement procedures
43