HP ProLiant DL380p HP Insight Server Migration Software for ProLiant User Guid - Page 103
SAN migrations, Download
 |
View all HP ProLiant DL380p manuals
Add to My Manuals
Save this manual to your list of manuals |
Page 103 highlights
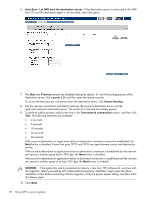
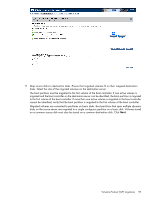
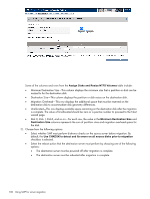
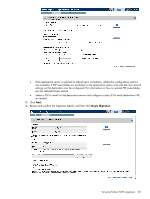
Additionally, to retain the original boot parameters, copy all valid flags from the original entry and consider other appropriate boot flags as applicable, such as adding the /3GB flag only if the destination physical machine is configured with sufficient RAM. Then delete the original (preserved) entry, shown as struck through in the following example. [boot loader] default=multi(0)disk(0)rdisk(0)partition(1)\WINDOWS timeout=30 [operating systems] multi(0)disk(0)rdisk(0)partition(1)\WINDOWS="Windows Server 2003, Enterprise" /sos /bootlog /noexecute=optout /fastdetect multi(0)disk(0)rdisk(0)partition(1)\WINDOWS="HP SMP Preserved: Windows Server 2003, Enterprise" /userva=3030 /3gb /noexecute=optout /fastdetect 9. Install the ProLiant Support Pack either from the SmartStart CD included with your server or by accessing http://h18000.www1.hp.com/products/servers/management/psp/index.html and clicking Download. SAN migrations IMPORTANT: SAN migrations are not supported for Linux migrations. SMP supports P2P and V2P migrations to servers with Fibre Channel SAN connectivity. To verify that your Fibre Channel HBA is supported, see the HP Insight Server Migration software for ProLiant Support Matrix. The steps for performing a P2P or a V2P migration to a server with Fibre Channel SAN connectivity are the same as performing a local disk migration described in the Performing a P2P migration and Performing a V2P migration sections, with the following additional preparatory steps before a migration: 1. You must manually set up the SAN environment. This involves creating logical units on the storage, configuring SAN switches, and configuring the Host Bus Adapter (HBA) BIOS on the destination server. • Creation of logical units. This requirement depends on the type of storage being used. If a Modular Smart Array (MSA) is used for storage, then the HP Array configuration utility can be used to create logical units. The HP Array configuration utility can be run from the SMP Boot CD after it is booted up on the destination server. If the storage being used is an Enterprise Virtual Array (EVA), then the management software specific to the storage must be used. For example, if you have an HP Command View EVA that can be used for configuring HP StorageWorks 4100/6100/8100 EVAs, you must verify that the logical units have been presented to the HBA of the destination server. • Configuration of SAN switches. Intermediate SAN switches used between the destination server and the storage must be configured for appropriate zoning to ensure proper visibility between the destination server and the storage array. • Configuration of the HBA BIOS. Verify that the relevant HBA port is the primary boot controller in the system BIOS. There are other commonly used configuration settings required in the BIOS of the HBA. The HBA configuration mechanism varies between HBAs. The HBA BIOS can be accessed while booting up the system. Ensure that the HBA BIOS is enabled, that the logical units that were created on the SAN storage in an earlier step are visible from the HBA BIOS, and that the logical unit to which you plan to migrate the boot partition on the source server is set as the boot LUN. 2. After setting up the SAN environment, boot the destination server using the Boot CD. 3. Run the Migration Wizard. 4. Follow the relevant migration steps in the Performing a P2P migration and Performing a V2P migration sections. 5. In step 5 (Specify destination disks) of the Migration Wizard, verify that you have selected the boot LUN that you configured in the HBA BIOS of the destination server when you migrate the boot partition on the source machine. SAN migrations 103
-
 1
1 -
2
-
3
-
4
-
5
-
6
-
7
-
8
-
9
-
10
-
11
-
12
-
13
-
14
-
15
-
16
-
17
-
18
-
19
-
20
-
21
-
22
-
23
-
24
-
25
-
26
-
27
-
28
-
29
-
30
-
31
-
32
-
33
-
34
-
35
-
36
-
37
-
38
-
39
-
40
-
41
-
42
-
43
-
44
-
45
-
46
-
47
-
48
-
49
-
50
-
51
-
52
-
53
-
54
-
55
-
56
-
57
-
58
-
59
-
60
-
61
-
62
-
63
-
64
-
65
-
66
-
67
-
68
-
69
-
70
-
71
-
72
-
73
-
74
-
75
-
76
-
77
-
78
-
79
-
80
-
81
-
82
-
83
-
84
-
85
-
86
-
87
-
88
-
89
-
90
-
91
-
92
-
93
-
94
-
95
-
96
-
97
-
 98
98 -
 99
99 -
 100
100 -
 101
101 -
 102
102 -
 103
103 -
 104
104 -
 105
105 -
 106
106 -
 107
107 -
 108
108 -
109
-
110
-
111
-
112
-
113
-
114
-
115
-
116
-
117
-
118
-
119
-
120
-
121
-
122
-
123
-
124
-
125
-
126
-
127
-
128
-
129
-
130
-
131
-
132
-
133
-
134
-
135
-
136
-
137
-
138
-
139
-
140
-
141
-
142
-
143
-
144
-
145
-
146
-
147
 |
 |